
![]()
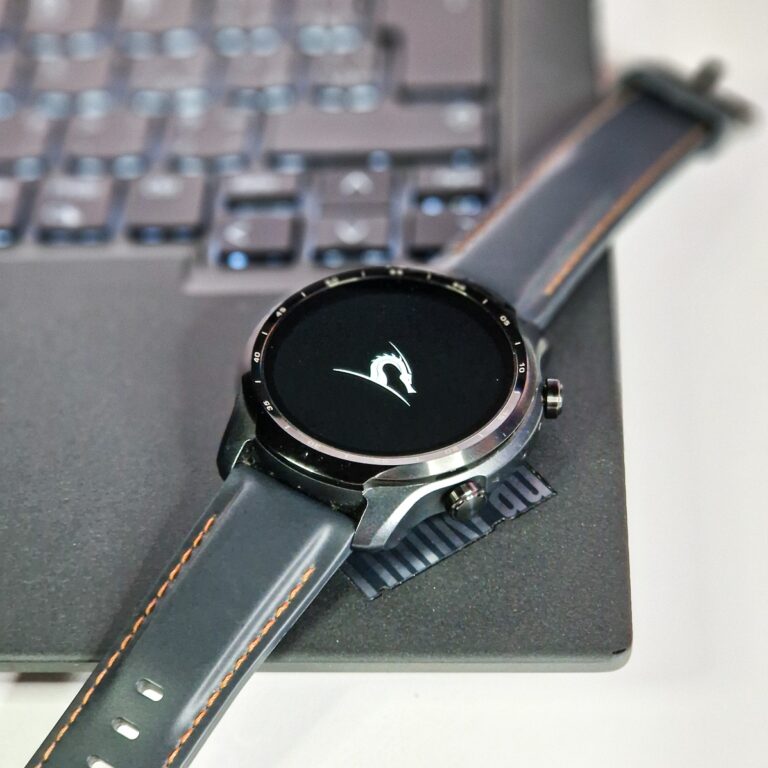
In previous series of blogs I focused on installation of Kali NetHunter on older model of TicWatch Pro 2018 (catfish) which might be for some of you a good choice if you already have them forgotten in your drawer or you can get them cheap to play around. In this post I will cover more recent and resource powerful TicWatch Pro 3 GPS model. According to official Kali NetHunter, this guide should also work on TicWatch Pro 3 GPS/LTE/Ultra GPS/Ultra LTE models.
Requirements
- ADB and fastboot tools installed on your computer.
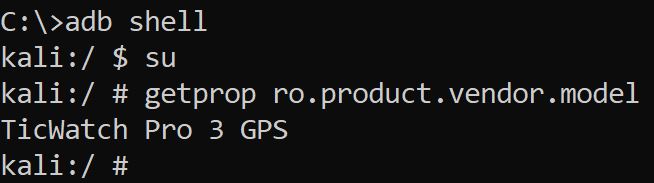
- I will use TicWatch Pro 3 GPS (Model rubyfish).
- Do it yourself (DIY) USB data cable.
- Download vendor ROM, optimized ROM, TWRP, Magisk.
- Download latest NetHunter ROM for TicWatch Pro (WearOS Nano).
Custom (DIY) USB data cable
Since default charging cable comes with only two charging pins, missing data transmission, we need to do it add them ourselves. Without this cable we can’t send ADB and fastboot commands to flash necessary files. There are three ways how to create such cable:
- Print 3-D charging dock station.
- Adjust charging station from older models with four pins such as TicWatch Pro or TicWatch E/S, see Figure 1.
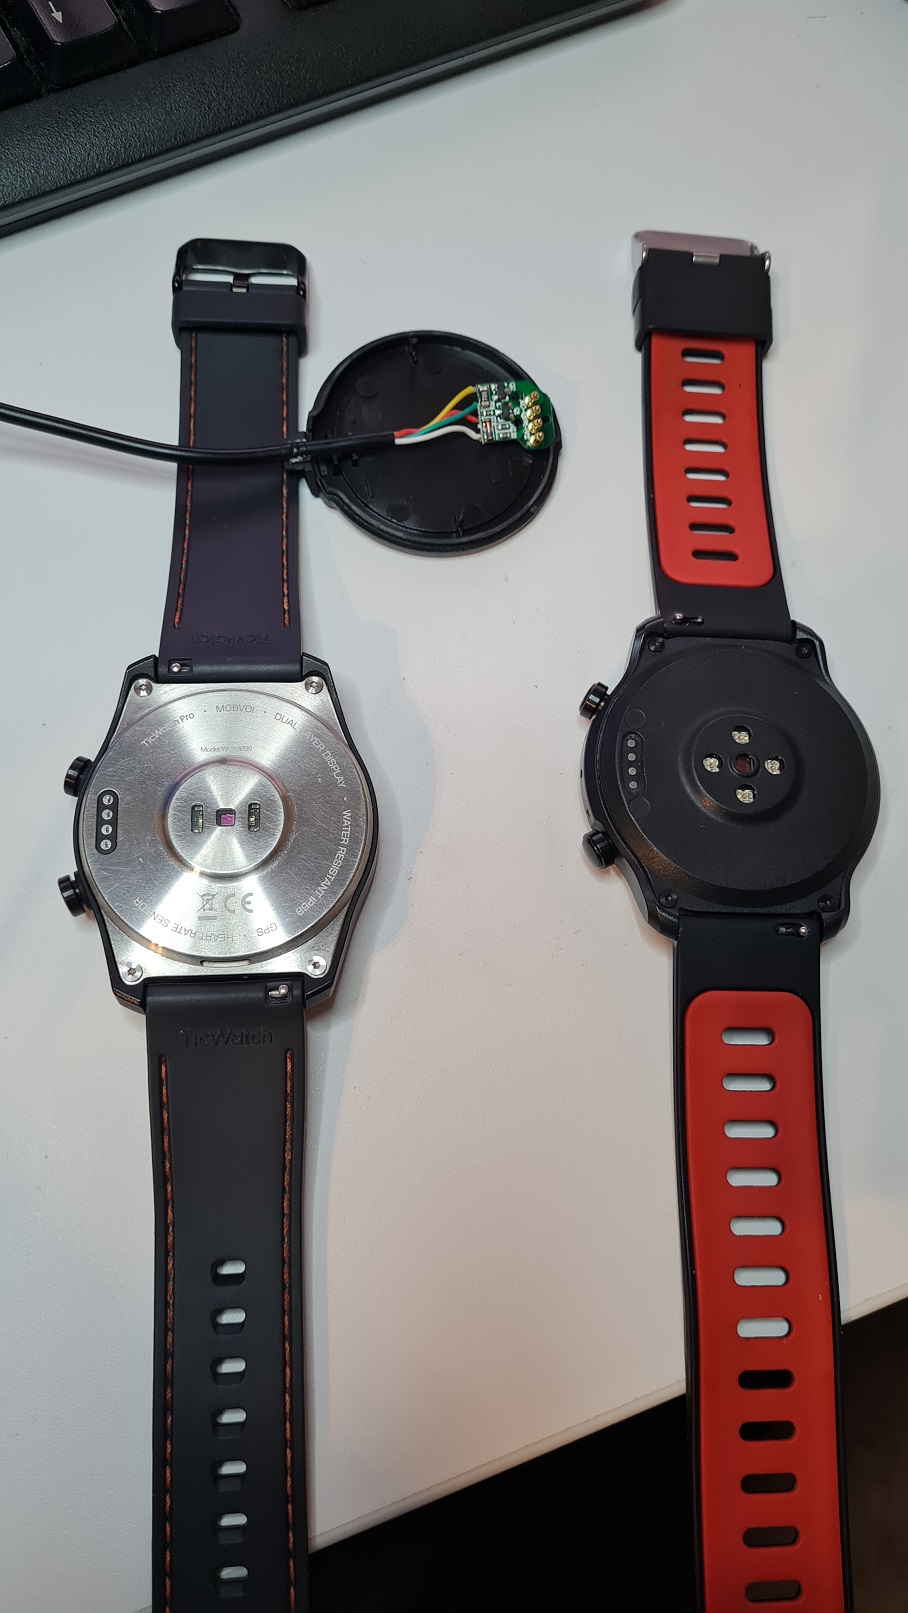
3. The easiest method is to use default charging cable and extra USB and use its two data wires, see diagram in Figure 2.
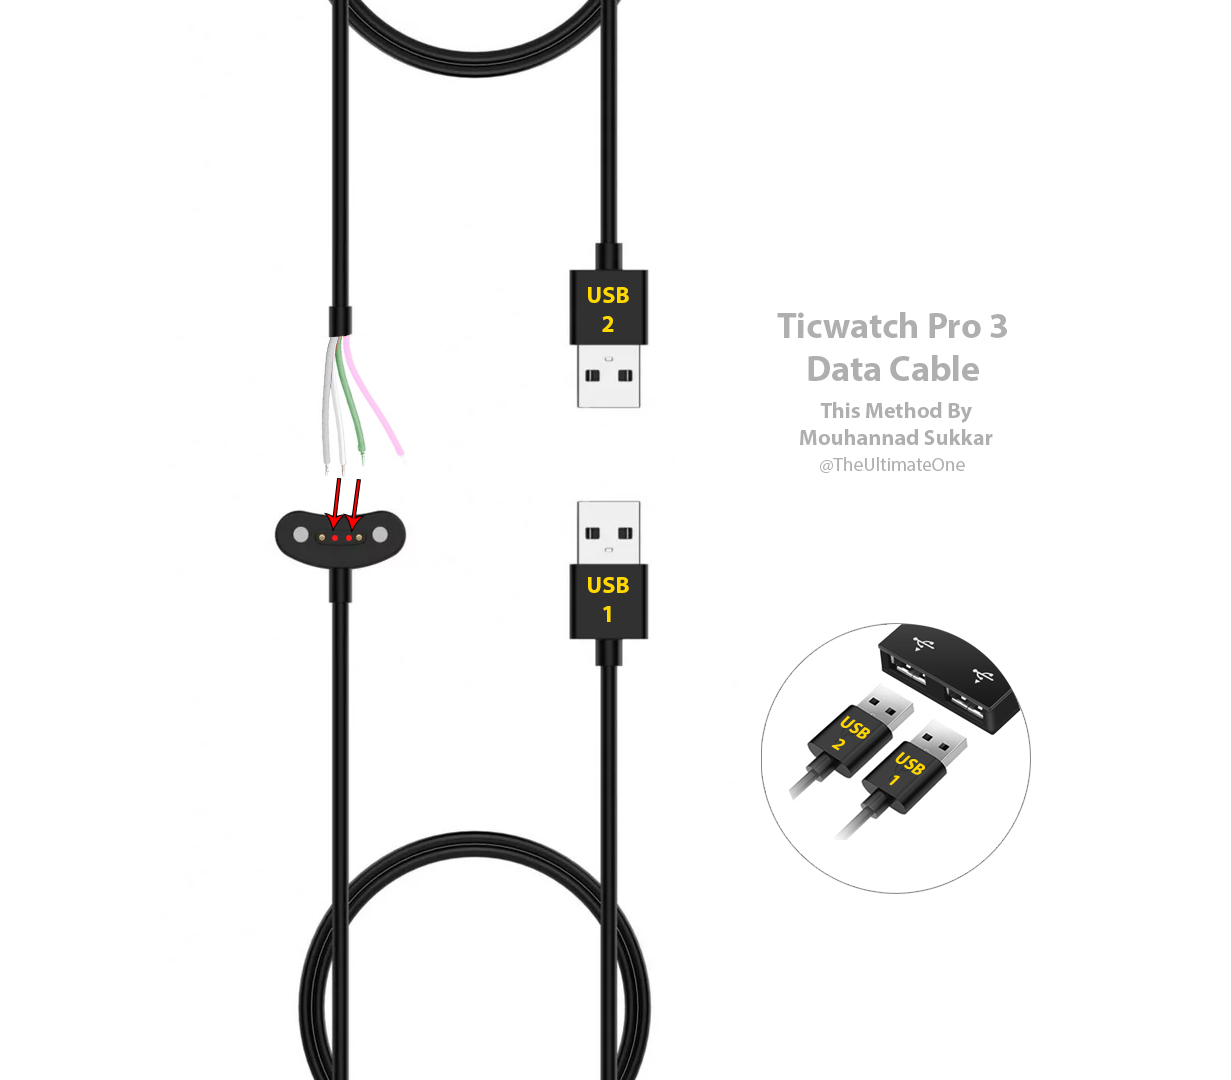
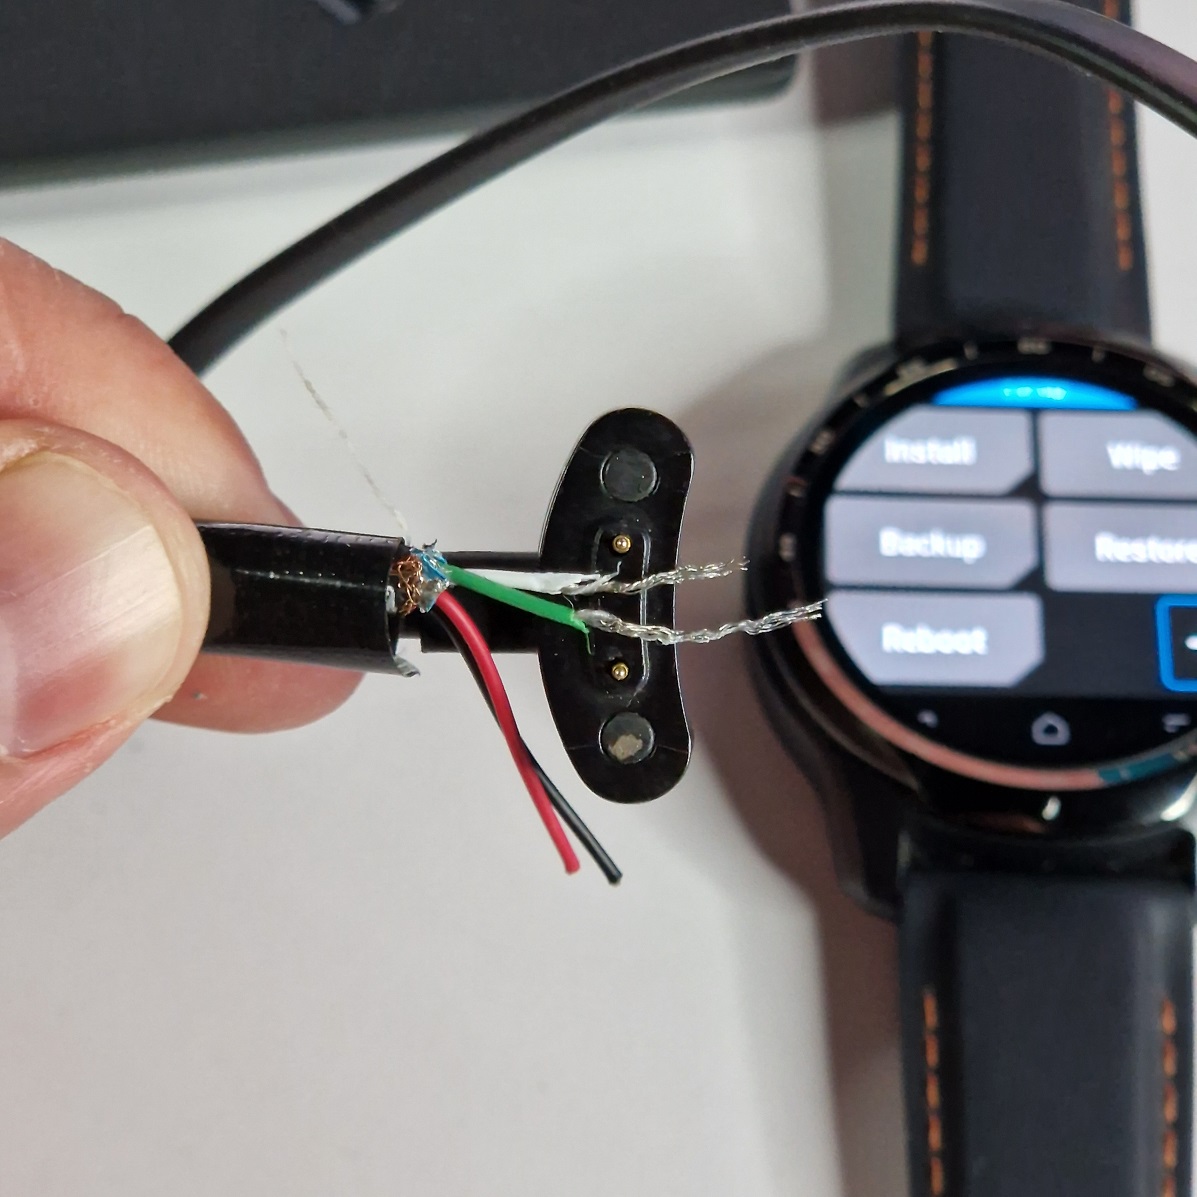
I followed this third method, and it worked well. However, you need to be patient when connecting extra cables, because then you need to turn the watch over and use side buttons. It is important that data cables don’t lose connectivity.
Installation instructions
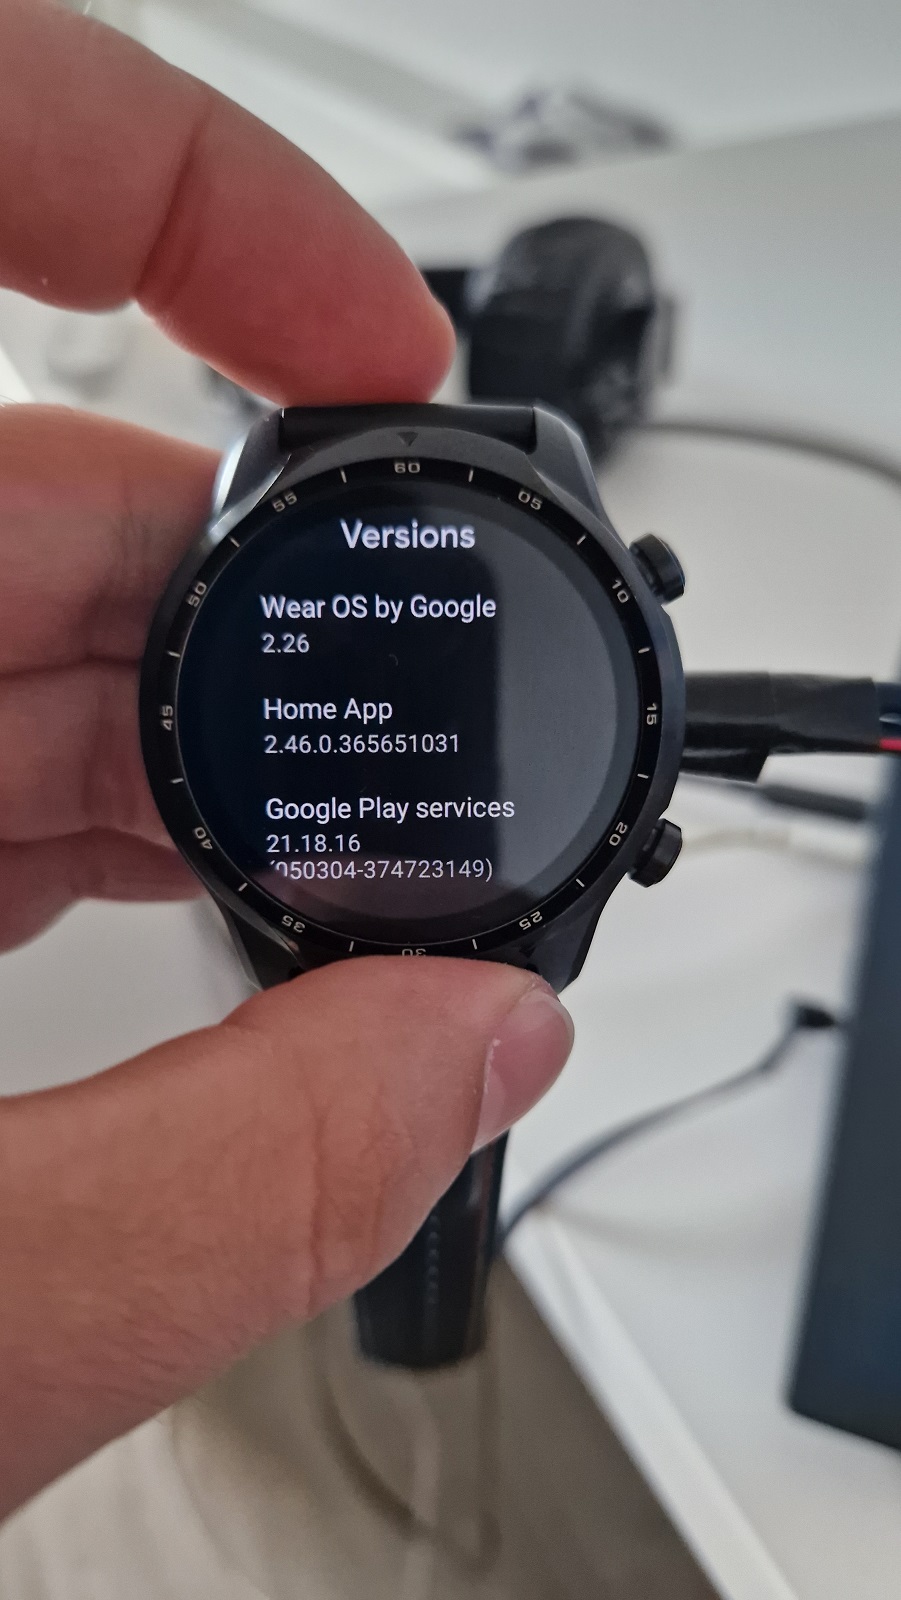
To install NetHunter with custom NetHunter kernel, we need to enable ADB debugging, unlock bootloader to flash custom recovery and install OneOS, flash Magisk to root the device and finally install NetHunter. I will install NetHunter on Wear OS 2.26, not version 3, see Figure 4.
Enable ADB debugging
Unlock developer mode and enable ADB debugging so we can control TicWatch from computer via ADB commands. To enable Developer options, go to Settings -> System -> About and tap 7 times on Build number.
Once Developer options appears in settings, enable ADB debugging so we can boot into bootloader. Open Settings -> Developer options and allow ADB debugging.
After ADB debugging is allowed, you will be prompted with computer authorization. Which basically means if these smartwatches trust connected computer. Select, Always allow from this computer.
Unlock bootloader
Now we need to boot watches in bootloader and unlock it, so we could flash it with custom ROM. You can start TicWatch in bootloader using adb command:
adb reboot bootloaderUnlock bootloader using:
fastboot oem unlock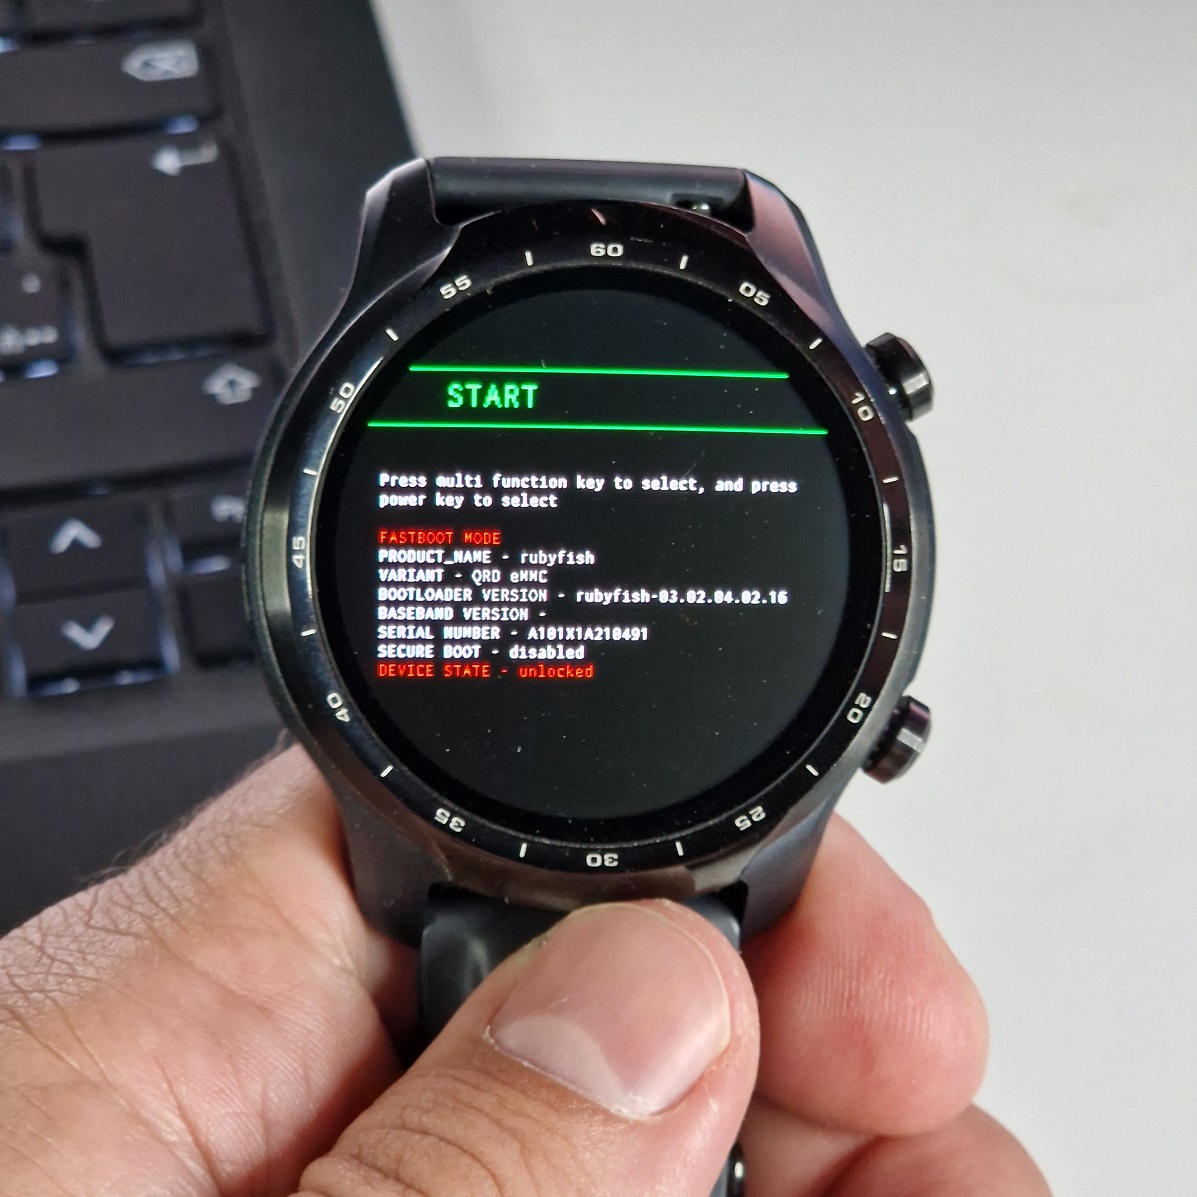
Flash images, TWRP, OneOS, Magisk
Enable ADB using previous steps and reboot to bootloader:
adb reboot bootloaderDisable vbmeta verification using command:
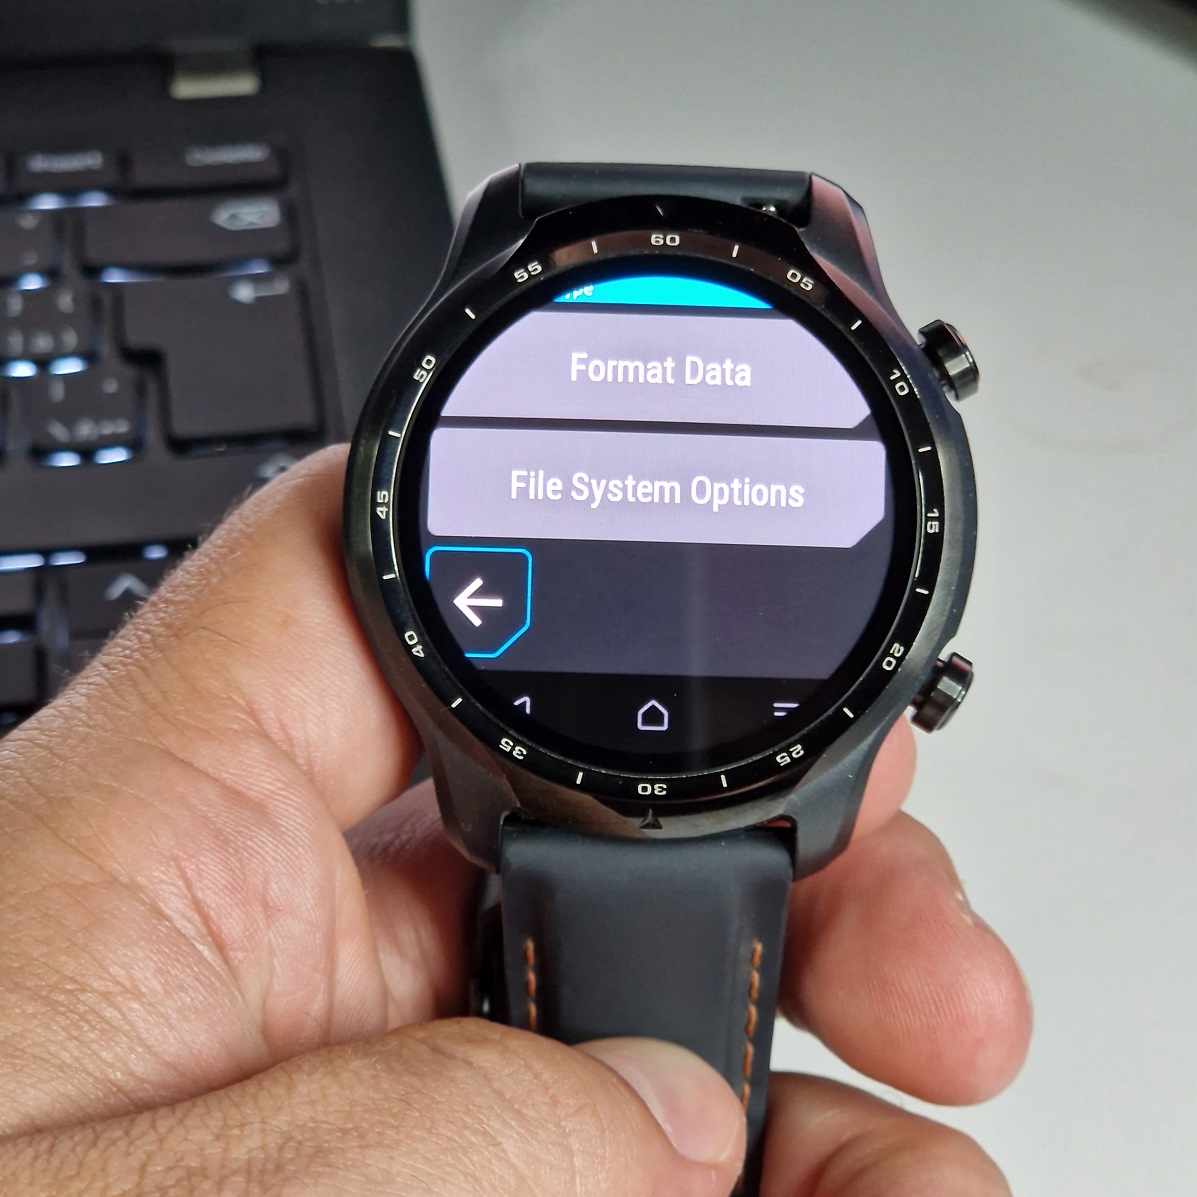
fastboot --disable-verity --disable-verification flash vbmeta vbmeta.imgFlash TWRP recovery and enter recovery mode:
fastboot flash recovery rubyfish_recovery.imgWipe data by selecting Wipe -> Next page -> Format Data
Once done, reboot to recovery.
Install OneOS by selecting Install -> ADB Sideload -> Start. From computer enter command:
adb sideload OneOS-22.08.24_rubyfish.zipSideload Mobvoi applications, either full, micro, nano or pico list of apps. I used pico variant:
adb sideload MobvoiAPPS-TWP3_pico.zipMake a copy of Magisk-v24.3.apk and rename it to Magisk-v24.3.zip. Using the same technique, sideload it:
adb sideload Magisk-v24.3.zipAnd finally, sideload DM-verity:
adb sideload Disable-DM-Verity_ForceEncrypt.zipReboot the TicWatch and go through initialization setup.
Enable ADB debugging again, because we need to install Magisk app:
adb install Magisk-v24.3.apkOpen Magisk Manager app and using ADB you can verify if device is rooted.
Install NetHunter
Reboot to recovery:
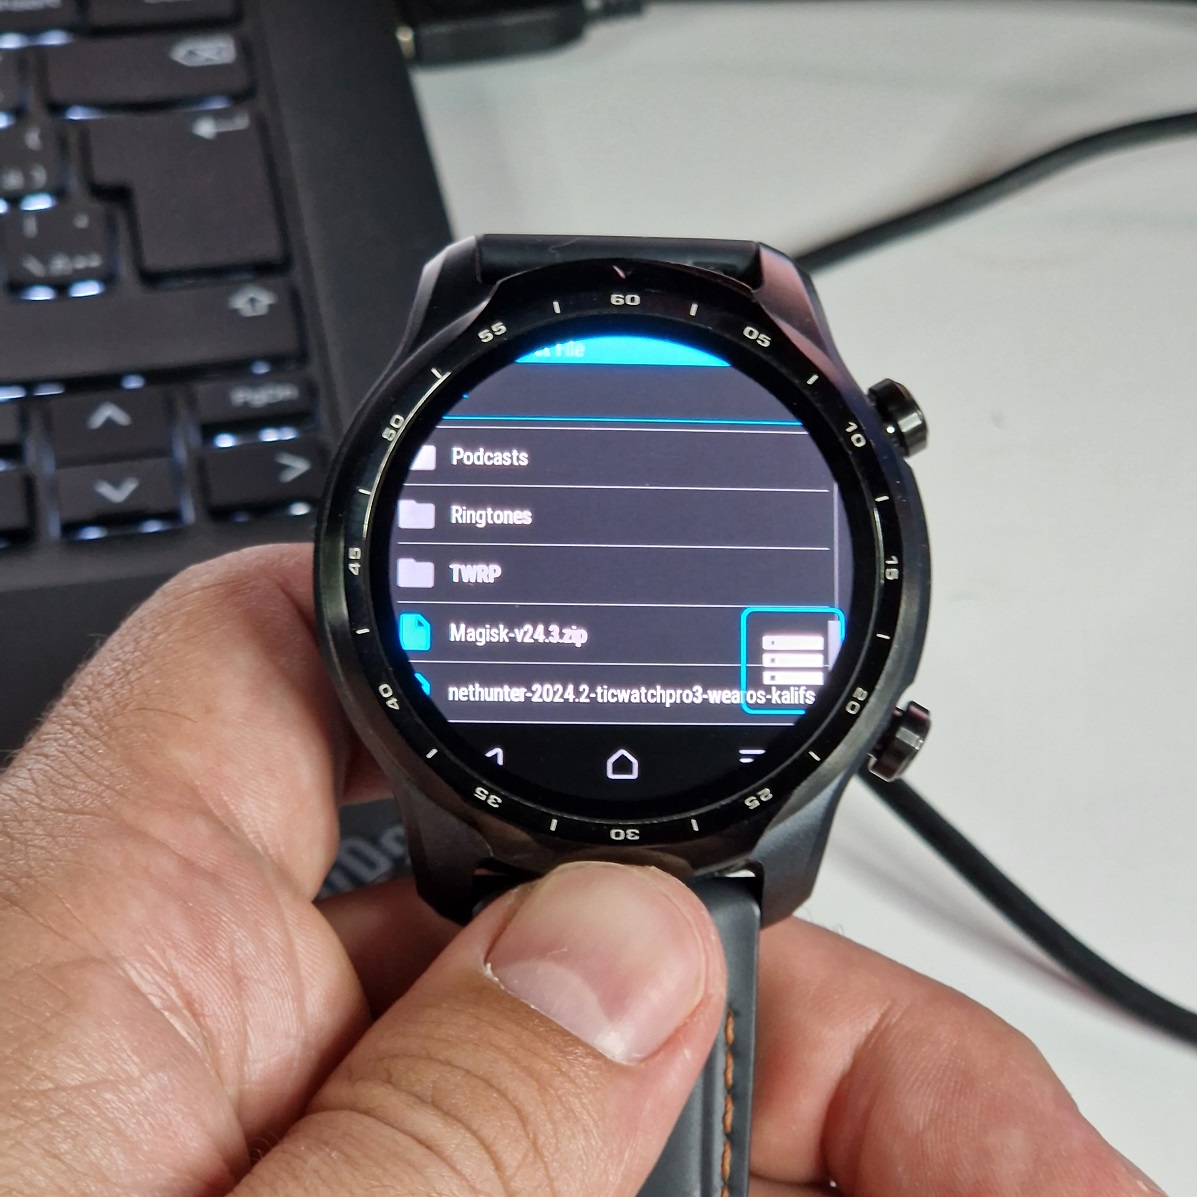
adb sideload recoveryInstall NetHunter image by selecting Install -> ADB Sideload -> Start. From computer enter command:
adb sideload nethunter-2024.2-ticwatchpro3-wearos-kalifs-nano.zip
Reboot to system and NetHunter should be successfully installed.
Update NetHunter
To update latest image from NetHunter website, you first need to flash the image, Magisk and DM-verity. If you don’t want to flash them using DIY cable, then I advise to copy them using adb commands over Wi-Fi (Debug over Wi-Fi). Then reboot to recovery, and flash necessary files via TWRP using commands:
adb reboot recoveryInstall -> nethunter-2024.3-ticwatchpro3-wearos-kalifs-nano.zip
Install -> Magisk-v24.3.zip
Install -> Disable-DM-Verity_ForceEncrypt.zip
After installation setup
Optionally, you can setup NetHunter watch face. I describe the steps in my previous blog.
Set density, so NetHunter buttons will be visible on OneOS using:
adb shell wm density 300NetHunter Terminal keyboard workaround
I found that software on screen keyboard isn’t properly displayed while using Terminal application. This can be really annoying, because some scripts require user input or just confirmation by pressing Enter.
To address this inconvenience, I came up with a simple workaround where you can send keys from a computer or a smartphone via ADB commands over Wi-Fi.
As a prerequisite, you need to install ADB on the device that will be used as a keyboard. For computer, it shouldn’t be a problem, however, it could be tricky for Android. Because of that, I created a quick video how to install termux-adb on non-rooted Android in Termux, feel free to check it out.
To install ADB on non rooted Android you have to:
- Install Termux and Termux:API apps from F-Droid
- Install wget:
pkg install wget - Run:
curl -s https://raw.githubusercontent.com/nohajc/termux-adb/master/install.sh | bash - Test by running:
termux-adb
On TicWatch, enable ADB over Wi-Fi (Debug over Wi-Fi) and wait until IP address of the watch is displayed. Make sure that both devices are on the same Wi-Fi. While on the go, you can create a hotspot. From your device connect to the TicWatch using the IP via commands:
adb connect 192.168.0.180:5555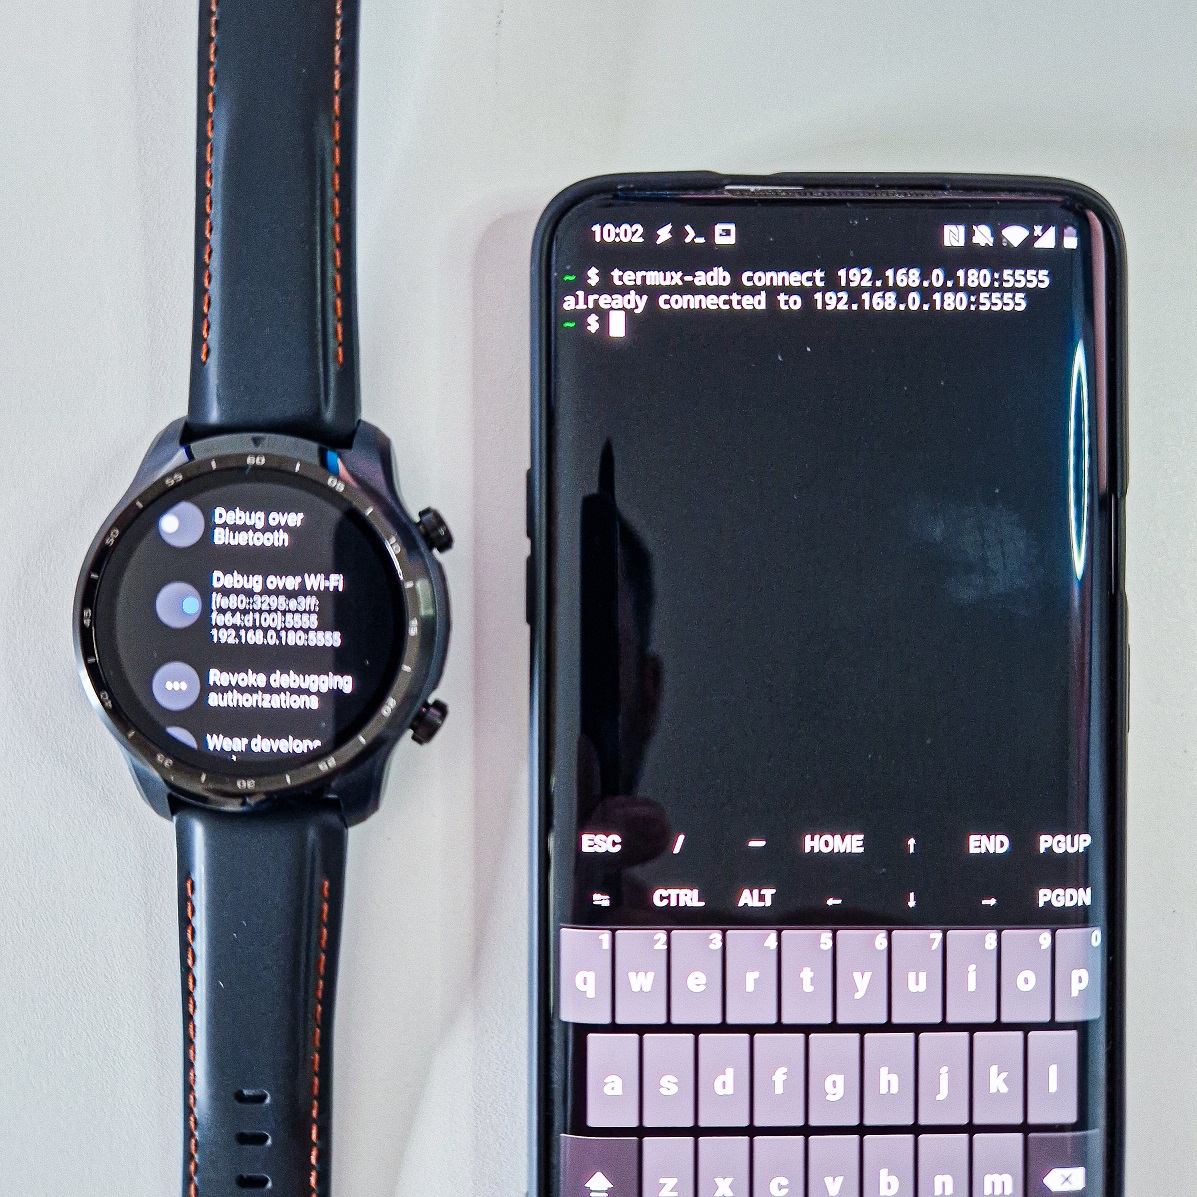
termux-adb to TicWatchYou can send either string or an even code such as Enter, Tab, Esc that are represented by specific numbers. Here are few command examples. You can also chain these commands by creating a script to save you time/
adb shell input text “ifconfig”
adb shell input text “ls%s-l” //%s represents a Space
adb shell input keyevent 66 //Enter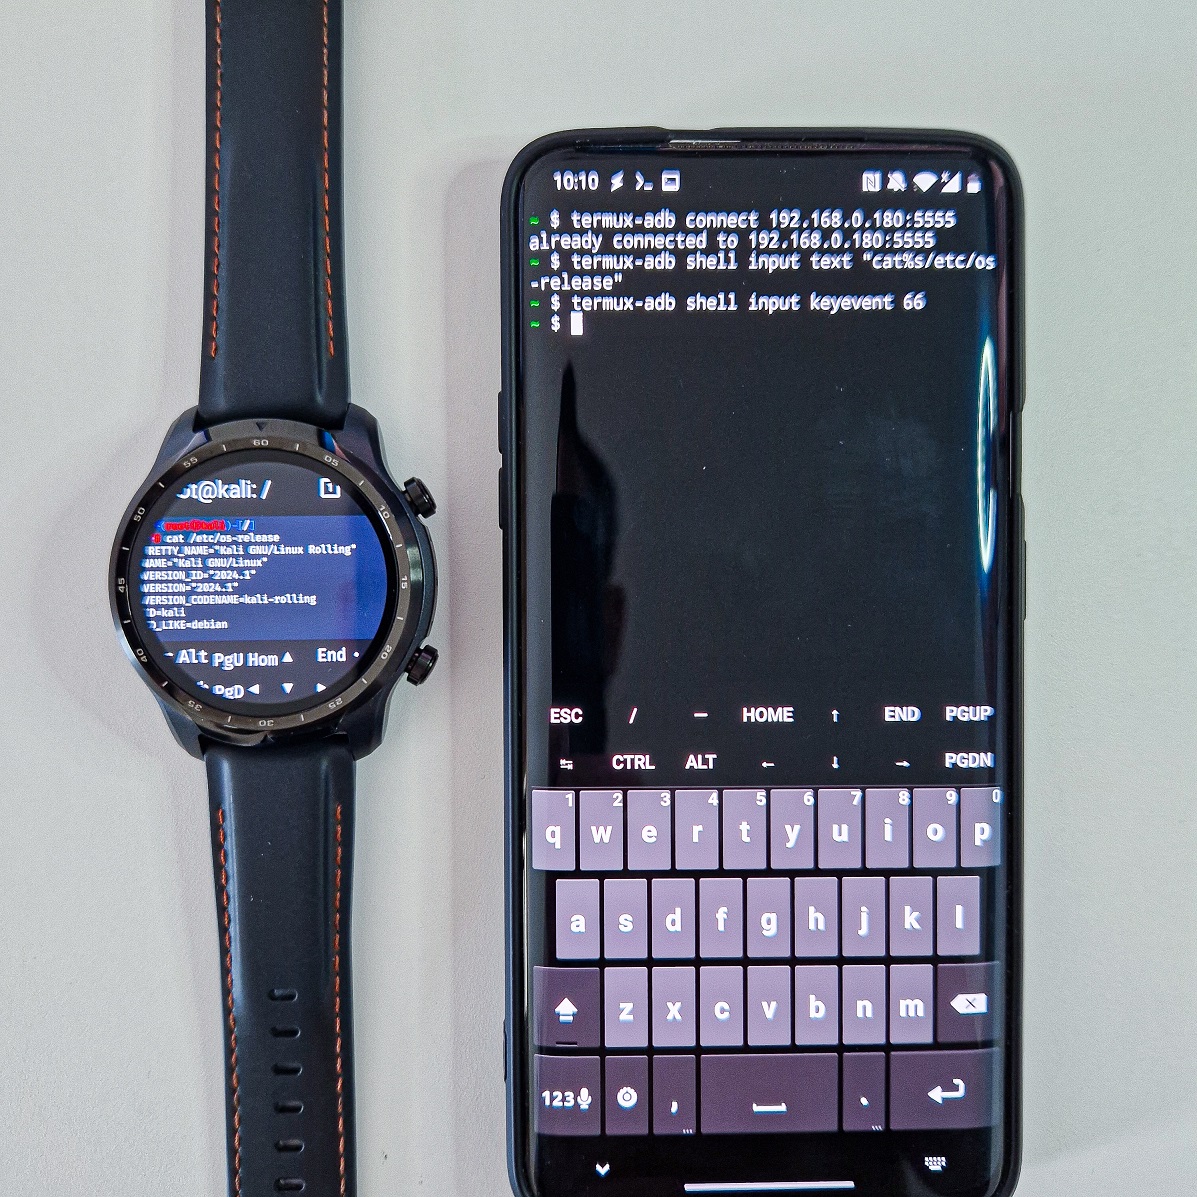
List of key codes is below. Complete list is available here.
0 -->  "KEYCODE_UNKNOWN"
1 -->  "KEYCODE_MENU"
2 -->  "KEYCODE_SOFT_RIGHT"
3 -->  "KEYCODE_HOME"
4 -->  "KEYCODE_BACK"
5 -->  "KEYCODE_CALL"
6 -->  "KEYCODE_ENDCALL"
7 -->  "KEYCODE_0"
8 -->  "KEYCODE_1"
9 -->  "KEYCODE_2"
10 -->  "KEYCODE_3"
11 -->  "KEYCODE_4"
12 -->  "KEYCODE_5"
13 -->  "KEYCODE_6"
14 -->  "KEYCODE_7"
15 -->  "KEYCODE_8"
16 -->  "KEYCODE_9"
17 -->  "KEYCODE_STAR"
18 -->  "KEYCODE_POUND"
19 -->  "KEYCODE_DPAD_UP"
20 -->  "KEYCODE_DPAD_DOWN"
21 -->  "KEYCODE_DPAD_LEFT"
22 -->  "KEYCODE_DPAD_RIGHT"
23 -->  "KEYCODE_DPAD_CENTER"
24 -->  "KEYCODE_VOLUME_UP"
25 -->  "KEYCODE_VOLUME_DOWN"
26 -->  "KEYCODE_POWER"
27 -->  "KEYCODE_CAMERA"
28 -->  "KEYCODE_CLEAR"
29 -->  "KEYCODE_A"
30 -->  "KEYCODE_B"
31 -->  "KEYCODE_C"
32 -->  "KEYCODE_D"
33 -->  "KEYCODE_E"
34 -->  "KEYCODE_F"
35 -->  "KEYCODE_G"
36 -->  "KEYCODE_H"
37 -->  "KEYCODE_I"
38 -->  "KEYCODE_J"
39 -->  "KEYCODE_K"
40 -->  "KEYCODE_L"
41 -->  "KEYCODE_M"
42 -->  "KEYCODE_N"
43 -->  "KEYCODE_O"
44 -->  "KEYCODE_P"
45 -->  "KEYCODE_Q"
46 -->  "KEYCODE_R"
47 -->  "KEYCODE_S"
48 -->  "KEYCODE_T"
49 -->  "KEYCODE_U"
50 -->  "KEYCODE_V"
51 -->  "KEYCODE_W"
52 -->  "KEYCODE_X"
53 -->  "KEYCODE_Y"
54 -->  "KEYCODE_Z"
55 -->  "KEYCODE_COMMA"
56 -->  "KEYCODE_PERIOD"
57 -->  "KEYCODE_ALT_LEFT"
58 -->  "KEYCODE_ALT_RIGHT"
59 -->  "KEYCODE_SHIFT_LEFT"
60 -->  "KEYCODE_SHIFT_RIGHT"
61 -->  "KEYCODE_TAB"
62 -->  "KEYCODE_SPACE"
63 -->  "KEYCODE_SYM"
64 -->  "KEYCODE_EXPLORER"
65 -->  "KEYCODE_ENVELOPE"
66 -->  "KEYCODE_ENTER"
67 -->  "KEYCODE_DEL"
68 -->  "KEYCODE_GRAVE"
69 -->  "KEYCODE_MINUS"
70 -->  "KEYCODE_EQUALS"
71 -->  "KEYCODE_LEFT_BRACKET"
72 -->  "KEYCODE_RIGHT_BRACKET"
73 -->  "KEYCODE_BACKSLASH"
74 -->  "KEYCODE_SEMICOLON"
75 -->  "KEYCODE_APOSTROPHE"
76 -->  "KEYCODE_SLASH"
77 -->  "KEYCODE_AT"
78 -->  "KEYCODE_NUM"
79 -->  "KEYCODE_HEADSETHOOK"
80 -->  "KEYCODE_FOCUS"
81 -->  "KEYCODE_PLUS"
82 -->  "KEYCODE_MENU"
83 -->  "KEYCODE_NOTIFICATION"
84 -->  "KEYCODE_SEARCH"
85 -->  "TAG_LAST_KEYCODE"
Troubleshoot
I didn’t have any issues during installation, however, if you stumble upon any problem, I would advise to check this XDA forum thread. There are very useful tips from community as well as directly from its developer @yesimxev.
Conclusion
We successfully rooted and installed Kali NetHunter with custom kernel on TicWatch Pro 3 without any issues. In upcoming blog, I will go through actual usage of NetHunter tools on these watches.